
Unlock the secrets to flawless baking and cooking by mastering essential kitchen conversions! Discover how many ounces are in a cup, understand the critical differences between liquid and dry measurements, and learn to navigate both imperial and metric systems with absolute confidence. This comprehensive guide will transform you into a measuring pro, ensuring every recipe turns out perfectly.
Picture this: You’re deep into preparing a delicious meal or baking a tempting dessert, only to hit a snag – your recipe calls for cups, but you only have ounces, or vice-versa. While a quick online search might offer a calculator, these tools often lack the context or accuracy needed for precise culinary results, leaving you frustrated and uncertain. The truth is, mastering kitchen measurements is a foundational skill for anyone who loves to cook or bake, directly impacting the success and consistency of your dishes.
This in-depth guide is meticulously crafted to demystify the art of kitchen conversions, specifically focusing on how many ounces are in a cup for both liquid and dry ingredients. We’ll delve into the nuances of different measurement systems, introduce you to the essential tools for accurate measuring, and provide expert tips to avoid common pitfalls. By the time you finish, you’ll possess the knowledge and confidence to tackle any recipe, ensuring every creation is a masterpiece!
Table of Contents: Your Guide to Perfect Measurements
- How to Convert Ounces to Cups for Culinary Success
- Understanding the Ounce: Volume vs. Weight
- The Versatility of a Measuring Cup
- Mastering Fluid Ounces to Liquid Cups Conversion
- Navigating Dry Ounces to Cups Conversion: Why Weight Matters
- Essential Equipment for Precision Measuring in Your Kitchen
- Imperial vs. Metric: Understanding Global Measurement Systems
- Best Practices for Filling Dry Measuring Cups
- Achieving Accuracy with Liquid Measuring Cups
- Fluid Ounces in a Cup: A Quick Reference
- Frequently Asked Questions About Kitchen Conversions
- Conclusion: Mastering Your Measurements, Mastering Your Kitchen
- More Helpful Resources for the Home Cook
How to Convert Ounces to Cups for Culinary Success
The journey to accurate cooking and baking begins with understanding basic conversions, especially for liquids. When dealing with fluid ounces and liquid cups, the conversion is straightforward and consistent, making it easier to adapt recipes. Here’s a foundational guide to converting fluid ounces to liquid cups, essential for most common liquid ingredients like water, milk, and oils:
- 1 cup = 8 fluid ounces (fl oz)
- ¾ cup = 6 fluid ounces
- ½ cup = 4 fluid ounces
- ¼ cup = 2 fluid ounces
- ⅛ cup = 1 fluid ounce
- 2 cups = 16 fluid ounces (1 pint)
- 4 cups = 32 fluid ounces (1 quart)
Remember, these conversions apply specifically to fluid ounces, which measure volume, and are used for liquid ingredients. Understanding this distinction is paramount before tackling dry ingredients, which introduce a different set of challenges due to varying densities.
Understanding the Ounce: Volume vs. Weight
The term “ounce” can sometimes be a source of confusion because it refers to two distinct types of measurements: **fluid ounces** and **ounces by weight**. Grasping this difference is fundamental to accurate cooking and baking, especially when converting between units.
A **fluid ounce (fl oz)** is a unit of volume, primarily used for measuring liquids. In the United States Customary System (USCS) and the Imperial System, it represents a specific amount of space a liquid occupies. The United States, along with a few other nations like Myanmar and Liberia, widely uses fluid ounces in culinary contexts. This unit is crucial for liquids where density is relatively consistent, making volume a reliable indicator of quantity.
On the other hand, an **ounce (oz)** is a unit of weight or mass. This measurement tells you how heavy an ingredient is, irrespective of the space it takes up. For dry ingredients like flour, sugar, or oats, weight is a far more accurate measure than volume. The weight of one cup of flour can differ significantly from one cup of sugar due to their differing densities. While grams are the standard for weighing smaller amounts in most of the world (using the metric system), ounces are prevalent in the USCS for similar purposes.
The key takeaway here is: always pay close attention to whether a recipe specifies “fluid ounces” (for liquids) or simply “ounces” (which typically implies weight for dry ingredients, though context is always king). This small distinction can make all the difference between a successful dish and a culinary mishap.
The Versatility of a Measuring Cup
When we talk about a “cup” in the kitchen, we’re not referring to the vessel you drink your coffee from! Instead, **measuring cups** are indispensable kitchen tools specifically designed to accurately quantify ingredients. These precise instruments are typically sold in sets, offering a range of sizes to accommodate various recipe requirements. From small fractions of a cup to multiple full cups, these sets ensure you have the right tool for every measurement.
Measuring cups come in two primary forms, each tailored for different types of ingredients:
- **Dry Measuring Cups:** These are designed to be leveled off, providing an exact volume for dry ingredients such as flour, sugar, spices, and grains. They are usually sold in sets of individual cups (e.g., ¼ cup, ⅓ cup, ½ cup, 1 cup).
- **Liquid Measuring Cups:** Characterized by a spout for easy pouring and clear markings along the side, these are used for liquids like water, milk, oil, broth, and sauces. Their design allows you to read the measurement accurately at eye level, preventing spills and ensuring precision.
Having a high-quality set of both dry and liquid measuring cups is fundamental for any home cook aiming for consistency and excellence in their culinary creations. They eliminate guesswork and provide the foundation for successful recipe execution.
Mastering Fluid Ounces to Liquid Cups Conversion
Converting fluid ounces to liquid cups is one of the most straightforward aspects of kitchen measurements, thanks to the consistent density of most liquids. This section provides a helpful conversion chart, making it easy to quickly reference common measurements. These conversions are rounded to the nearest whole number for simplicity and practical use in everyday cooking and baking.
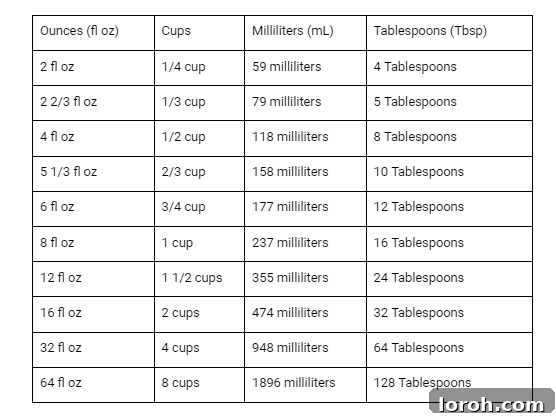
This chart is an invaluable tool for ensuring you have the correct liquid quantities, whether you’re following a recipe or adapting one. Always remember to use liquid measuring cups for these conversions to ensure accuracy, as their design facilitates precise readings for fluid volumes.
Navigating Dry Ounces to Cups Conversion: Why Weight Matters
Unlike liquid ingredients, converting dry ounces to cups introduces a significant variable: density. The weight of a cup of dry ingredients can vary drastically depending on the ingredient itself, how finely it’s ground, and how it’s packed into the cup. For instance, a cup of flour will weigh considerably less than a cup of sugar, and a cup of loosely sifted flour will weigh less than a cup of packed flour.
This inherent variability makes volume measurements (cups) less reliable for dry ingredients, especially in baking where precision is paramount. A small difference in the amount of flour or sugar can alter the texture, consistency, and overall success of a baked good. For this reason, professional bakers and experienced home cooks strongly advocate for using a kitchen scale to measure dry ingredients by weight (ounces or grams) whenever possible.
While an exact universal conversion chart for dry ounces to cups is impossible due to density variations, here are some common approximations and why weighing is superior:
- **All-Purpose Flour:** Approximately 4.25 to 4.5 ounces per cup (when spooned and leveled).
- **Granulated Sugar:** Approximately 7 ounces per cup.
- **Brown Sugar:** Approximately 7.5 to 8 ounces per cup (when packed).
- **Rolled Oats:** Approximately 3.5 ounces per cup.
Notice the wide range even for common ingredients. Using a scale eliminates the guesswork and inconsistency associated with volume measurements for dry ingredients. If a recipe provides measurements in ounces or grams for dry components, always opt to use a kitchen scale for the most accurate results. For those times when you only have volume measurements, a reliable ingredient weight chart, such as this comprehensive chart from King Arthur Baking, can be incredibly helpful for converting common ingredients.
In summary, for unparalleled accuracy in baking and cooking, especially with dry ingredients, prioritize measuring by weight (ounces or grams) rather than by volume (cups). This simple switch will elevate your culinary precision and lead to consistently better outcomes.
Essential Equipment for Precision Measuring in Your Kitchen
Achieving accuracy in the kitchen relies heavily on having the right tools. For measuring ounces and cups, three indispensable pieces of equipment form the cornerstone of a well-equipped culinary space: dry measuring cups, liquid measuring cups, and measuring spoons. Investing in quality versions of these tools will significantly improve your cooking and baking results.
These essential measuring tools are available in various materials, including durable plastic, classic glass, and sturdy stainless steel. Each material offers distinct advantages in terms of durability, ease of cleaning, and aesthetic appeal, allowing you to choose what best fits your kitchen style and needs.
Granulated (Dry) Measuring Cups
These specialized cups are designed for precisely measuring dry ingredients such as flour, sugar, rice, oats, and spices. They are typically sold in sets of individual cups, often ranging from ¼ cup to 1 cup, ensuring you can accurately measure various quantities. The design allows for leveling off the top, which is crucial for consistent dry ingredient measurements.
- Key Features: Flat rims for easy leveling, usually made of plastic or metal.
- Tip for Measuring Flour: Flour can easily become compacted, leading to over-measurement. To ensure accuracy, especially for delicate baked goods, always aerate your flour first by sifting it or lightly whisking it in its container. Then, use the “spoon and level” method. This involves gently spooning the flour into the measuring cup until it overflows, then using a straight edge (like the back of a knife or a flat spatula) to level off the excess. This technique prevents over-packing and ensures you get the exact amount of flour intended by the recipe.
Liquid Measuring Cups
Liquid measuring cups are specifically designed for fluid ingredients suchosing water, milk, oil, broths, and sauces. Their distinguishing features include a spout for pouring and clear measurement lines, often marked for cups, fluid ounces, and milliliters, allowing for versatile use across different recipes and systems.
- Key Features: Transparent material (glass or clear plastic), a spout for pouring, and clear markings visible from the side.
- Why They’re Different: The space above the highest measurement line prevents spills, and the ability to read at eye level ensures accurate volume assessment of liquids, which can form a meniscus.
Measuring Spoons
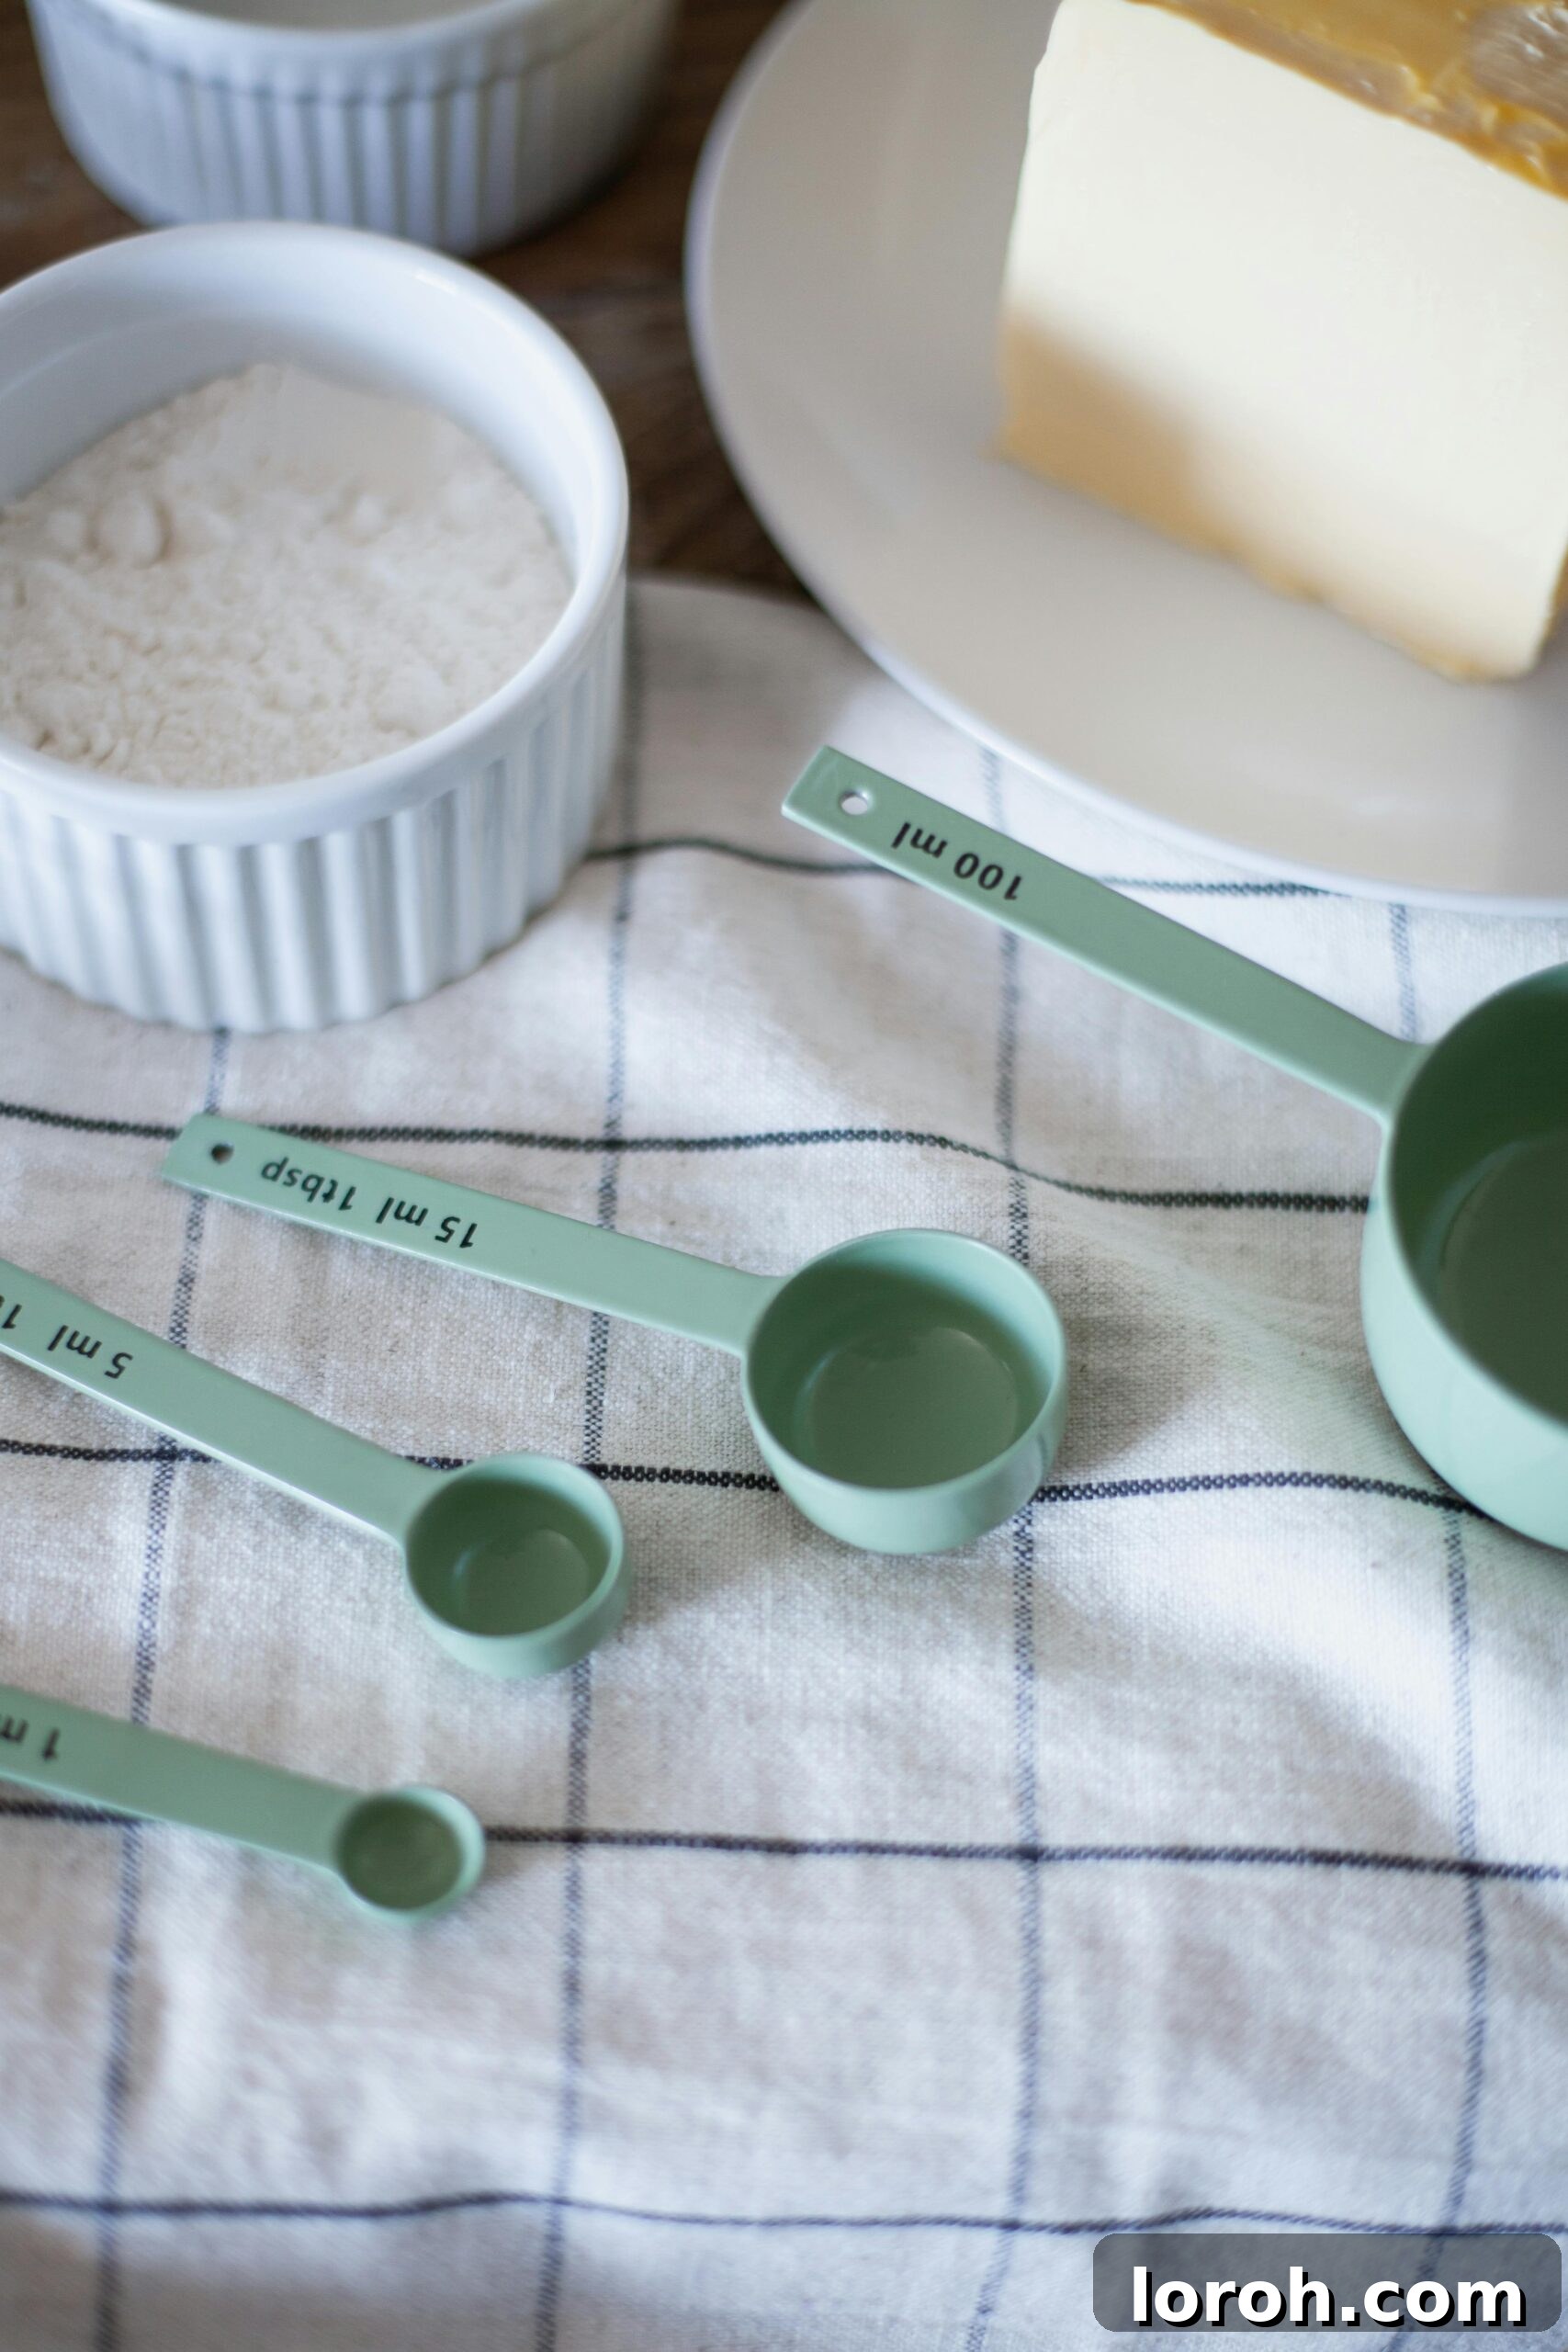
For smaller quantities of both wet and dry ingredients, measuring spoons are indispensable. They typically come in sets including tablespoon (tbsp or T), teaspoon (tsp or t), half teaspoon, and quarter teaspoon sizes. These are perfect for ingredients like vanilla extract, baking powder, salt, and spices where even slight variations can dramatically impact flavor and texture.
- Key Features: Small, precise measurements for both liquid and dry components.
- Versatility: Essential for spices, extracts, leavening agents, and small amounts of sugar or salt.
Equipping your kitchen with these fundamental measuring tools and understanding their proper use is a critical step towards consistently delicious culinary results. Precision in measurement is often the silent hero behind a perfectly executed dish.
Imperial vs. Metric: Understanding Global Measurement Systems
Navigating recipes from around the world can sometimes feel like learning a new language, especially when it comes to measurement systems. The exact definitions of a “cup” or even an “ounce” can vary significantly based on whether a recipe originates from a country using the Imperial system or the Metric system. Understanding these differences is crucial for accurate conversions and successful recipe outcomes, preventing potential disappointments when cooking international dishes.
There are three primary measurement systems encountered in global cuisine:
- United States Customary System (USCS): Often referred to as the Imperial system in common parlance, though technically distinct. This system is predominantly used in the United States and Liberia. Here, 1 cup is defined as approximately 240 milliliters (mL) or 8 fluid ounces.
- Imperial System: Historically used in the United Kingdom, Canada, Australia, and other Commonwealth nations. While many of these countries have largely transitioned to the metric system for daily life, older or traditional recipes might still reference imperial units. An Imperial cup is significantly larger, typically around 284 milliliters (mL). An Imperial fluid ounce is also slightly different from a US fluid ounce.
- Metric System: This is the most widely adopted system globally, used by the vast majority of countries. In the metric system, a standard “cup” for culinary purposes is often approximated as 250 milliliters (mL), though many recipes will specify ingredients by weight (grams) or volume (milliliters) directly, foregoing the ambiguous “cup” altogether for dry ingredients.
The difference between a US cup (240 mL) and a metric cup (250 mL) or even an old Imperial cup (284 mL) might seem small, but for sensitive recipes, especially in baking, these discrepancies can accumulate and lead to noticeable differences in texture and consistency. Imagine using a 284 mL cup for a recipe designed for a 240 mL cup; you’d be adding almost 18% more of each ingredient, potentially ruining the delicate balance of flavors and structures.
To ensure the best results, always do the following:
- Check the Recipe’s Origin: If possible, identify the origin of your recipe. Recipes from the US will use US Customary measurements. Recipes from the UK or Australia are likely to be metric or old imperial.
- Use a Conversion Chart: Keep a reliable conversion chart handy, or better yet, a kitchen scale that can switch between grams, ounces, and pounds.
- Invest in Multi-System Tools: Some measuring cups and spoons come with markings for both US Customary and metric units, which can be incredibly helpful.
By being mindful of these global differences and making appropriate conversions, you can confidently explore a wider range of international recipes and consistently achieve the intended delicious results.
Best Practices for Filling Dry Measuring Cups: Ensuring Accuracy
Accurately measuring dry ingredients is a cornerstone of successful baking and cooking, especially for items like flour, sugar, and grains. The way you fill a dry measuring cup can significantly impact the final quantity, leading to inconsistent results if not done correctly. Follow these essential tips to ensure precision every time:
- Prepare Your Ingredients: Before measuring, it’s crucial to ensure your dry ingredients are free of clumps and evenly textured. For flour, gently aerate it by whisking it in its container or passing it through a sieve. This prevents over-packing and ensures a lighter, more accurate measure. For ingredients like brown sugar, which are prone to clumping, break up any large lumps before measuring.
- Spoon and Level Method: This is the gold standard for measuring flour and other light, dry ingredients. Instead of scooping the measuring cup directly into the ingredient container (which can compact the ingredient), use a spoon to gently scoop the ingredient into your dry measuring cup until it overflows. Once the cup is overfilled, use the straight edge of a knife or a flat spatula to level off the excess, scraping it away from you across the top of the cup. This method ensures you get a consistent, uncompacted volume.
- Avoid Packing (Unless Specified): Unless a recipe explicitly instructs you to “pack” an ingredient (as is common for brown sugar or sometimes shredded cheese), do not press down on the ingredient in the measuring cup. Packing can drastically increase the amount of ingredient, altering the recipe’s balance. For example, a packed cup of flour can weigh significantly more than a spooned and leveled cup, leading to a dry or dense baked good.
By consistently applying these techniques, you’ll eliminate guesswork and achieve a higher level of accuracy with your dry ingredient measurements, leading to more predictable and delicious culinary outcomes.
Achieving Accuracy with Liquid Measuring Cups: A Clear Approach
Measuring liquid ingredients accurately might seem simpler than measuring dry ones, but there are specific techniques that ensure precision and prevent errors. The design of liquid measuring cups with their spouts and clear markings facilitates this, but proper execution is key. Follow these straightforward steps for perfect liquid measurements every time:
- Place on a Flat, Level Surface: Always place your liquid measuring cup on a flat, stable counter or table before pouring. Holding the cup in your hand while pouring can lead to an inaccurate reading, as it’s difficult to keep it perfectly level and steady. A flat surface ensures the liquid settles evenly and provides a true indication of its volume.
- Pour with Care: Slowly and steadily pour the liquid ingredient into the measuring cup. Overfilling can lead to spills and wasted ingredients, while pouring too quickly might create bubbles that obscure the true liquid level. Aim for a smooth, controlled pour.
- Read at Eye Level: This is perhaps the most critical step for liquid accuracy. Once you’ve poured the liquid, bend down so your eyes are level with the surface of the liquid in the cup. Do not read the measurement from above or below, as this can create a parallax error, making the liquid appear higher or lower than it actually is. Look for the bottom of the meniscus (the slight curve formed by the liquid’s surface) to align with your desired measurement line.
By adhering to these simple yet effective practices, you can confidently measure all your liquid ingredients with optimal accuracy, contributing to the overall success and consistency of your recipes.
Fluid Ounces in a Cup: A Quick Reference for Liquids
For liquid ingredients, the conversion between fluid ounces and cups (using American measurements) is consistent and easy to remember. This relationship forms the basis for many kitchen conversions and is fundamental for any home cook or baker. To reiterate and provide a quick reference, there are precisely 8 fluid ounces (fl oz) in a single cup.
This consistent conversion makes scaling recipes up or down, or simply understanding ingredient quantities, remarkably simple. Here are some useful measurements to keep in mind for common liquid volumes:
- 8 fluid ounces = 1 cup
- 16 fluid ounces = 2 cups (or 1 pint)
- 24 fluid ounces = 3 cups
- 32 fluid ounces = 4 cups (or 1 quart)
- 64 fluid ounces = 8 cups (or 2 quarts / ½ gallon)
- 128 fluid ounces = 16 cups (or 4 quarts / 1 gallon)
These conversions are invaluable for a wide array of liquid ingredients, from water and milk to oils, stocks, and sauces. By internalizing these basic equivalences, you’ll be able to confidently handle any liquid measurement a recipe throws your way, ensuring your dishes always have the perfect balance of moisture and flavor.
Frequently Asked Questions About Kitchen Conversions
Even with the most comprehensive guides, specific questions often arise when tackling kitchen measurements. Here, we address some of the most common queries to help clarify any lingering doubts and further empower your culinary journey.
This is a trickier question than it seems because the weight of a “dry cup” varies significantly by ingredient due to differences in density. For example, a cup of all-purpose flour typically weighs around 4.25 to 4.5 ounces (when spooned and leveled), while a cup of granulated sugar is about 7 ounces. For precise results with dry ingredients, measuring by weight (ounces or grams) using a kitchen scale is always recommended over volume (cups).
In the U.S. Customary System, there are 16 cups of liquid ingredients in one gallon. For dry ingredients, this conversion is less standardized due to density variations, but if you’re referring to a “dry gallon” (which is less common in everyday cooking), it would contain 18.62 U.S. dry cups.
Using U.S. liquid measurements, 1 liquid quart is exactly equal to 2 pints. This is a consistent conversion for all liquid ingredients.
Butter is an interesting case as it’s often measured by weight or by common stick measurements. In the U.S., one cup of butter is equivalent to 8 fluid ounces by volume, and also approximately 8 ounces by weight (since butter’s density is very close to water). A standard stick of butter is typically ½ cup, or 4 ounces.
For water, the conversion is straightforward: there are 8 fluid ounces in a cup. Since water’s density is 1 gram per milliliter (or approximately 1 ounce per fluid ounce), 1 cup of water also weighs about 8 ounces.
A cup of all-purpose flour, when properly spooned and leveled, typically weighs approximately 4.25 to 4.5 ounces. This can vary slightly based on the type of flour (e.g., bread flour is denser) and humidity, further emphasizing why weighing flour is superior for baking.
A cup of cooked rice generally weighs around 6 to 7 ounces. While the initial prompt stated 8 ounces, this can vary significantly based on the type of rice (e.g., long-grain vs. short-grain), how much water it absorbed, and how densely it’s packed. For cooked rice, volume (cups) is a more common and practical measurement than precise weight.
While similar, they are not identical. A U.S. fluid ounce is approximately 29.57 milliliters, whereas an Imperial fluid ounce is about 28.41 milliliters. This difference, though small, means that recipes using Imperial measurements will require slightly less liquid per “fluid ounce” unit than U.S. recipes, highlighting the importance of knowing your recipe’s origin.
Recipes from professional chefs, bakers, and many international sources often use weight for dry ingredients because it offers superior accuracy and consistency. Volume measurements for dry goods can vary wildly based on how ingredients are scooped and packed, as well as their density. Home cooking recipes, particularly older or American ones, frequently use volume due to the historical prevalence of measuring cups in home kitchens, but for best results, especially in baking, weight is always preferred.
Conclusion: Mastering Your Measurements, Mastering Your Kitchen
Embarking on a culinary adventure requires not just passion and creativity, but also a solid foundation in fundamental techniques – and accurate measurement is undoubtedly one of the most critical. This guide has illuminated the often-confusing world of kitchen conversions, emphasizing the vital distinction between measuring dry and wet ingredients, and highlighting the importance of understanding different global measurement systems.
The core takeaway is clear: while liquid ingredients typically adhere to straightforward fluid ounce-to-cup conversions (with 8 fluid ounces equaling 1 cup in the US system), dry ingredients demand a different approach. Their varying densities make volume measurements unreliable, advocating strongly for the use of a kitchen scale to measure by weight (ounces or grams) for unparalleled precision, especially in baking.
Equipped with the knowledge of how many ounces are in a cup, the proper use of measuring tools, and an awareness of imperial versus metric differences, you are now empowered to approach any recipe with newfound confidence. No longer will conversion questions halt your cooking momentum or compromise your results. Use the insights and charts provided in this post as your trusted companions, and prepare to elevate your culinary skills to new heights. Happy cooking and baking!
More Helpful Resources for the Home Cook
- How Many Tablespoons Are in a Cup? (A Conversion Guide)
- Melting Chocolate: A Guide to Perfect Tempering
- Baking Powder Vs. Bicarbonate of Soda: Understanding Leavening Agents
- How to Turn Plain Flour Into Self-Raising Flour: A Handy Kitchen Hack
- Exploring Different Types of Sugar in Baking: A Sweet Guide
- A Comprehensive Guide to Different Types of Flour and Their Uses