

Magnus Nilsson-Inspired Cinnamon Buns: A Delightful Baking Journey
Margie
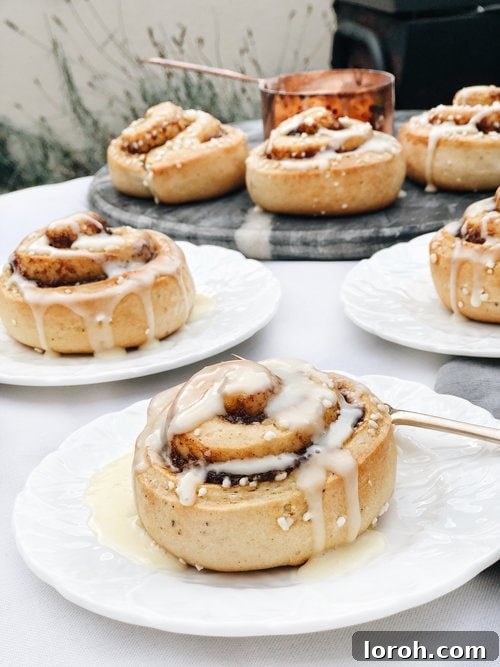
There’s a special magic in baking, especially when it comes to creating something as universally beloved as cinnamon buns. My journey to perfecting these irresistible treats has been a flavorful adventure, blending classic Nordic principles with a touch of personal flair. When I first shared these cardamom-infused wonders on Instagram, complete with a luscious layer of icing, I was playfully reminded that such a topping might be considered “un-Nordic.” And to that, I offer my sincere apologies to the purists! However, I simply adore the harmonious contrast: the soft, pillowy dough, rich with cinnamon and cardamom, perfectly complemented by the sharp, sweet glaze. It’s a combination that transports me back to my childhood in London, where my introduction to these buns always involved a generous frosting. Perhaps not traditional, but undeniably delicious and deeply nostalgic.
My quest wasn’t just about recreating a childhood memory; it was about understanding the soul of a truly great cinnamon bun. This led me to explore various recipes, delving into the meticulous world of Nordic baking, much like the approach of culinary giants such as Magnus Nilsson, who champions regional ingredients and precise techniques. While I haven’t quite mastered foraging for every ingredient, the spirit of quality and attention to detail certainly resonates.
After several rewarding experimental sessions, I found myself repeatedly returning to the exceptional insights of Felicity Cloake. Her “How to cook the perfect…” series for The Guardian is a masterclass in culinary refinement, and her cinnamon bun recipe provided the ideal foundation. This recipe is very much inspired by her thoughtful methodology, allowing me to build upon a robust framework and infuse it with my own personal touches, ensuring each bun is a testament to both tradition and personal preference.
You might be surprised to learn that baking these exquisite buns at home is far less daunting than it sounds. With a bit of patience and passion, you can easily replicate the warmth, aroma, and profound satisfaction that comes with homemade cinnamon buns. Prepare to embark on a delightful baking journey that fills your kitchen with an intoxicating fragrance and your palate with unparalleled joy!
6
buns
45 minutes
25 minutes
Rate Recipe
Print Recipe
Save This Recipe for Later!
Enter your email address to have this recipe sent directly to your inbox. Plus, receive new and exciting recipes from us every week!
Ingredients
The foundation of any great bake lies in the quality and precise measurement of its ingredients. For these cinnamon buns, fresh cardamom and good butter are non-negotiable for achieving that authentic Nordic flavor and delightful texture.
For the Dough:
- 300 ml Milk: Full-fat milk is recommended for a richer dough, warmed to lukewarm.
- 1 tsp Ground Cardamom: This is the signature spice! For unparalleled fragrance, bash approximately 20 green cardamom pods in a pestle and mortar or grind in a coffee grinder yourself. The difference is truly remarkable.
- 50 g Butter: Unsalted, melted and cooled to lukewarm before adding to the milk mixture.
- 450 g All-Purpose Flour: Or strong bread flour for a slightly chewier bun.
- 1 Large Egg: At room temperature, for better incorporation into the dough.
- 7 g Fast-Action Yeast: Equivalent to one standard packet. Ensure it’s fresh for an active rise.
- 70 g Caster Sugar: Fine granulated sugar helps sweeten the dough without making it too heavy.
- 1/4 tsp Salt: A pinch of salt enhances all the flavors and balances the sweetness.
For the Filling:
The heart of these buns, this luscious filling provides the signature gooey center and aromatic spice.
- 80 g Butter: Softened to room temperature, making it wonderfully easy to spread.
- 25 g Light Brown Sugar: Contributes a mellow sweetness and a hint of molasses flavor.
- 25 g Dark Brown Sugar: Adds a deeper, richer caramel note and additional moisture.
- 1/4 tsp Salt: A tiny amount to amplify the sweetness and spice.
- 2 tsp Ground Cinnamon: The star spice for an authentic cinnamon bun experience.
For Finishing:
These final touches give the buns a beautiful golden crust and a delightful sugary sparkle.
- 1 Egg: Beaten, for a lustrous egg wash.
- Demerara Sugar: For sprinkling, adding a fantastic texture and rustic appeal.
- Icing Sugar and Water (optional, for glaze): To create a simple, sharp glaze as a personal touch.
Instructions: Crafting Your Perfect Cinnamon Buns
Baking these cinnamon buns is a therapeutic process that rewards patience and attention to detail. Follow these steps carefully for the best results.
-
1. Infuse the Milk
In a small saucepan, gently heat the 300ml milk with the 1 tsp ground cardamom. Bring the mixture just to the point of simmering, watching carefully to ensure it doesn’t boil over. As soon as small bubbles appear around the edges, remove it from the heat. Stir in the 50g butter until it has fully melted. Allow this cardamom-infused milk mixture to cool to lukewarm – it should feel comfortably warm to the touch, roughly 37°C (98°F). This temperature is crucial for the yeast’s activity. -
2. Combine Dry Ingredients
In a large mixing bowl, combine the 450g flour, 7g fast-action yeast, 70g caster sugar, and 1/4 tsp salt. Whisk these dry ingredients together thoroughly to ensure they are well distributed. Create a generous well in the center of the mixture. -
3. Mix the Dough
Crack the egg into the well you’ve created in the dry ingredients. Gradually pour in the lukewarm milk and butter mixture. Using a sturdy wooden spoon or your hands, begin to incorporate the dry ingredients into the wet, mixing until everything comes together to form a soft, shaggy dough. Avoid overmixing at this stage. -
4. Knead Until Smooth
Transfer the dough to a lightly floured surface. Knead the dough vigorously for about 8-10 minutes. This process develops the gluten, resulting in a smooth, elastic dough that is no longer sticky and springs back when gently pressed. If using a stand mixer with a dough hook, knead for 5-7 minutes on medium speed. -
5. First Proofing
Lightly grease the mixing bowl with a little oil. Place the kneaded dough back into the bowl, turning it once to coat lightly with oil. Cover the bowl with a clean tea towel or cling film. Leave it in a warm, draft-free place to rise for approximately 30 minutes to 1 hour, or until the dough has visibly doubled in size. This first proof is essential for flavor development and a light texture. -
6. Prepare the Filling
While your dough is busy rising, prepare the delicious filling. In a separate bowl, combine the 80g softened butter, 25g light brown sugar, 25g dark brown sugar, 1/4 tsp salt, and 2 tsp ground cinnamon. Beat these ingredients together with a spoon or a hand mixer until the mixture is light, creamy, and easily spreadable. Set aside. -
7. Roll Out the Dough
Once the dough has completed its first proof and doubled in size, gently punch it down to release the trapped air. Transfer the dough to a lightly floured work surface. Using a rolling pin, roll the dough into a large, even rectangle, approximately 35 cm x 20 cm (about 14 inches x 8 inches) in size. Aim for consistent thickness across the entire sheet of dough. -
8. Spread the Filling Evenly
Using an offset spatula or the back of a spoon, evenly spread the prepared butter and sugar filling across the entire surface of the rolled-out dough. Leave a small, clean border (about 1 cm or 0.5 inches) along one of the longer edges; this will help seal the roll. -
9. Roll into a Swiss Roll
Starting from the longer edge opposite the clean border, carefully and tightly roll the dough into a log, just like you would a Swiss roll. Ensure your roll is as snug as possible to prevent gaps in the finished buns. Once rolled, pinch the seam along the bottom to seal it securely. -
10. Slice and Arrange
Using a very sharp knife or a piece of unflavored dental floss, cut the dough log into 6 equally sized slices. For uniform buns, each slice should be approximately 3.5 cm (about 1.5 inches) thick. Arrange these beautiful swirls onto a large baking tray lined with parchment paper, ensuring there are generous spaces between each bun as they will expand significantly during the second proof and baking. -
11. Second Proofing
Loosely cover the baking tray with a clean tea towel. Let the buns prove again in a warm, draft-free spot for another 30 minutes, or until they have nearly doubled in size once more and look visibly puffy. This second rise is crucial for light and airy buns. -
12. Preheat Oven & Prepare Egg Wash
While your buns are on their second proof, preheat your oven to 200°C (390°F). In a small bowl, lightly beat the remaining egg for the egg wash. -
13. Bake to Golden Perfection
Just before placing the buns in the oven, gently brush the tops of the risen buns with the beaten egg wash. This will give them a lovely sheen and help the sugar stick. Sprinkle generously with Demerara sugar for a sparkling, crunchy crust. Bake for approximately 25 minutes, or until the buns are a beautiful golden brown on top and cooked through. They should feel light and sound hollow when tapped gently on the bottom. -
14. Cool and Serve (with Icing!)
Remove the baked buns from the oven and let them cool slightly on the baking tray for a few minutes before transferring them to a wire rack to cool completely. These buns are absolutely divine served warm, ideally on the day they are baked. For my personal, unapologetically “un-Nordic” twist, I love to drizzle them with a simple icing made by whisking icing sugar with a tiny amount of water until it reaches a smooth, pourable consistency. Enjoy every heavenly bite!
Expert Tips for Cinnamon Bun Success
Achieving bakery-quality cinnamon buns at home is easier than you think with these helpful pointers:
- Mind the Milk Temperature: For active yeast, ensure your milk-butter mixture is lukewarm, not hot. Too hot will kill the yeast, too cold will slow it down significantly.
- Knead Thoroughly: Proper kneading develops the gluten, giving your buns their characteristic chewiness and elasticity. Don’t skimp on this step!
- Create a Warm Proofing Environment: Yeast loves warmth. A slightly warmed oven (turned off, with just the light on), a sunny windowsill, or even placing the bowl in a larger bowl of warm water can create the ideal conditions for rising.
- Don’t Over-Flour: When rolling out the dough, use minimal extra flour on your surface and rolling pin. Excessive flour can dry out the dough, leading to tough buns.
- Roll Tightly: A tight roll of the dough is key to achieving those beautiful, well-defined spirals of filling in your finished buns.
- Sharp Knife or Dental Floss: For clean cuts that maintain the bun’s shape, use a very sharp, un-serrated knife, or gently slide a piece of unflavored dental floss under the log, cross the ends, and pull to slice.
- Space Them Out: Give your buns ample room on the baking sheet. They expand considerably during the second proof and in the oven.
- Customize Your Sweetness: While the Demerara sugar offers a lovely crunch, feel free to skip the icing if you prefer a less sweet, more traditional Nordic experience.
Delicious Variations & Serving Ideas
Once you’ve mastered the classic, don’t hesitate to experiment with these creative twists:
- Orange Zest Infusion: Add the zest of one orange to your dough or mix it into the filling for a brighter, citrusy note.
- Nutty Cinnamon Buns: Sprinkle finely chopped pecans or walnuts over the filling before rolling the dough for added texture and flavor.
- Cream Cheese Frosting: For a richer, American-style finish, swap the simple icing for a classic cream cheese frosting.
- Apple & Cinnamon: Thinly slice some Granny Smith apples and layer them over the filling before rolling for a delightful fruity addition.
- Cardamom Glaze: Instead of plain icing, infuse your water with a tiny pinch of ground cardamom before mixing with icing sugar for an extra aromatic glaze.
- Serving Suggestions: These buns are perfect for breakfast, brunch, or an afternoon coffee break (fika!). They are also a comforting dessert, perhaps served warm with a scoop of vanilla bean ice cream.
Storage and Reheating Recommendations
Ensure your delicious homemade cinnamon buns stay fresh and enjoyable for as long as possible:
- Short-Term Storage: Cinnamon buns are truly best enjoyed on the day they are baked, ideally warm from the oven. Any leftovers can be stored in an airtight container at room temperature for up to 2-3 days.
- Freezing Unbaked Buns: If you want to prepare ahead, you can freeze the shaped, unbaked buns. Place them on a baking sheet and freeze until solid, then transfer them to a freezer-safe bag or container. When ready to bake, thaw them overnight in the refrigerator, then let them come to room temperature and proof as usual before baking.
- Freezing Baked Buns: Baked buns can also be frozen for up to 1-2 months. Wrap them individually in plastic wrap, then aluminum foil, to prevent freezer burn. Thaw at room temperature and reheat.
- Reheating: To bring baked buns back to their fresh-out-of-the-oven glory, warm individual buns in the microwave for 15-30 seconds. Alternatively, heat in a preheated oven at 150°C (300°F) for 10-15 minutes until warmed through.
Loved baking these Magnus Nilsson-inspired cinnamon buns? We’d be thrilled to hear about your experience! Share your thoughts and leave a comment below.