
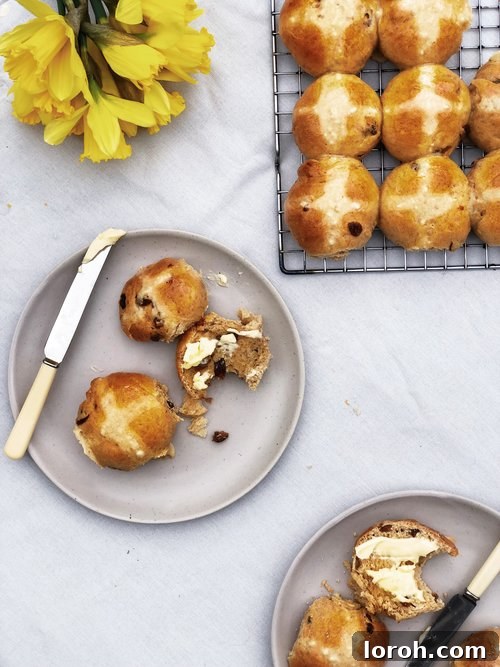

Easy & Delicious Homemade Hot Cross Buns
By: Margie
As the vibrant hues of spring begin to paint our world, bringing with them a delightful harvest of seasonal treasures like new potatoes, fresh asparagus, and succulent samphire, there’s one particular culinary emblem that truly heralds the arrival of Easter: the cherished Hot Cross Bun. These beautifully spiced, fruit-studded buns, elegantly marked with their signature white cross, are more than just a sweet treat; they are a centuries-old tradition, a symbol of comfort, and a cornerstone of Easter celebrations.
For me, few experiences rival the pure joy and profound comfort found in a freshly baked, still-warm hot cross bun, sliced in half and generously adorned with an almost indecent amount of melting butter. The way the butter soaks into the soft, fragrant dough is simply divine. And the best part? They are incredibly delicious and, contrary to a common misconception, surprisingly straightforward to make from scratch right in your own kitchen.
If the thought of baking homemade hot cross buns has ever seemed daunting, let this be the year you conquer it! This comprehensive, easy-to-follow recipe is designed to guide even novice bakers through the process, ensuring a batch of perfectly soft, irresistibly fluffy, and exquisitely flavorful buns that will undoubtedly become an instant family favourite. Imagine the incredible aroma filling your home as these golden treats bake – a sensory delight that store-bought versions simply cannot replicate. So, roll up your sleeves, gather your ingredients, and prepare to elevate your Easter baking with these magnificent homemade hot cross buns!
Preparation Time: 30 minutes
Baking Time: 20 minutes
Proving Time: Approximately 1 hour 45 minutes (total for both rises)
Yields: 12 perfectly sized buns
Rate Recipe
Print Recipe
Ingredients List
For the Enriched Dough:
- 175 ml Whole Milk: Provides moisture and richness.
- 60 g Unsalted Butter: Adds flavour and tenderness to the dough.
- 2 Whole Cloves: Infused into the milk for a subtle, warming spice note.
- Zest of 1 Large Orange: Essential for a bright, aromatic citrus lift that complements the spices.
- 375 g Strong Bread Flour: High protein content is crucial for developing gluten, yielding a chewy texture and good rise.
- 7 g Fast Action Yeast (1 sachet): The leavening agent that makes your buns light and airy.
- 50 g Caster Sugar: Sweetens the dough and aids in yeast activation.
- Pinch of Fine Salt: Balances the flavours and controls yeast activity.
- 1 Large Egg: Adds richness, colour, and helps bind the dough.
- 150 g Dried Currants: Traditional fruit choice; can be substituted with sultanas or mixed dried fruit.
- 1 tsp Ground Cinnamon: A core spice for that signature hot cross bun flavour.
- ½ tsp Ground Ginger: Adds a gentle warmth and depth.
- Optional: Additional ½ tsp Mixed Spice: For an even richer, more complex traditional flavour profile.
Baker’s Note on Ingredients: Don’t underestimate the power of fresh orange zest – it truly brightens the overall flavour. If strong bread flour is hard to find, all-purpose flour can work, but your buns might be slightly less chewy. Ensure your dried fruit is plump; soaking them in a little hot tea or orange juice for 15 minutes and then draining can enhance moisture if they seem dry.
For the Iconic White Crosses:
- ½ cup Plain Flour: Forms the base of the piping paste.
- 1 tbsp Caster Sugar: Adds a touch of sweetness to the cross.
- 5 tbsp Water: Used to achieve the correct, pipeable consistency.
Cross Perfection Tip: The ideal consistency for the cross paste is like thick paint. It needs to be firm enough to hold its shape after piping but smooth enough to flow freely through a piping bag or a snipped corner of a zip-top bag. Adjust water gradually if needed.
For the Signature Glossy Glaze:
- 1 tbsp Caster Sugar: For a simple sugar syrup.
- 2 tbsp Boiling Water: To dissolve the sugar quickly.
- Alternative Glazes: For a deeper shine and flavour, consider gently melted apricot jam (strained for smoothness) or golden syrup, a technique famously favoured by culinary legend Mary Berry.
Glaze Application Insight: Applying the glaze while the buns are still hot from the oven is key. The heat allows the sugar syrup to absorb beautifully, creating that irresistible sweet, shiny finish that makes hot cross buns so appealing.
Step-by-Step Cooking Instructions
-
Infuse the Milk Mixture: In a small saucepan, combine the whole milk, butter, fresh orange zest, and whole cloves. Heat this mixture gently over low heat, stirring occasionally, until the butter is completely melted. Once melted, immediately remove the pan from the heat. It is crucial to allow this mixture to cool down until it is lukewarm – imagine the temperature of a baby’s bath. This ensures the warmth is sufficient to activate the yeast without being hot enough to kill it, which would prevent your buns from rising.
-
Prepare the Dry Ingredients: While your fragrant milk infusion is cooling, take a large mixing bowl. Into this bowl, add the strong bread flour, caster sugar, fast-action yeast, a pinch of salt, the dried currants, ground cinnamon, and ground ginger (and any optional mixed spice). Use a whisk to thoroughly combine all these dry ingredients, ensuring an even distribution of the yeast, sugar, spices, and fruit.
-
Combine and Form Dough: Once the milk mixture has reached the perfect lukewarm temperature, carefully fish out and discard the whole cloves. Crack the large egg directly into the milk mixture and whisk vigorously until it is well combined. Now, pour this warm, eggy milk mixture into the bowl with your prepared dry ingredients. Stir everything together using a sturdy wooden spoon or your hands until the ingredients come together to form a rough, shaggy dough.
-
Knead for Perfection: Turn the shaggy dough out onto a lightly floured clean work surface. Begin the kneading process. Knead the dough energetically for approximately 10 minutes. This step is absolutely fundamental; thorough kneading develops the gluten in the strong bread flour, which is what gives hot cross buns their characteristic elasticity, strength, and ultimately, their wonderfully soft and airy texture. You’ll know the dough is perfectly kneaded when it feels smooth, elastic, and no longer sticks to your hands or the work surface. If you own a stand mixer with a dough hook, this process can be done in about 5-7 minutes on medium speed, saving your arms!
-
First Prove (The Bulk Rise): Lightly grease a large, clean bowl with a little oil. Place the kneaded dough into the bowl, turning it over once to ensure it’s lightly coated in oil – this prevents it from drying out. Cover the bowl tightly with a clean tea towel or plastic wrap. Now, find a warm, draft-free spot for its first rise. An airing cupboard works perfectly, or a clever trick is to turn your oven on its lowest setting for just a few minutes, then switch it off and let the dough rise inside the residual warmth. The dough needs to double in size, which can take anywhere from 40 minutes to 1 hour and 20 minutes, depending on the ambient temperature. Patience is a virtue here; do not rush this crucial proving stage.
-
Shape the Buns & Prepare for Second Prove: Once your dough has proudly doubled in size, gently ‘punch it down’ to release the trapped air. Turn the dough out onto your work surface and roll it into an even, long sausage shape. Using a sharp knife or dough cutter, divide the dough into 12 equal pieces. For consistent results and baking, weighing each piece (around 50-55g) is highly recommended. Roll each individual piece into a smooth, tight ball. Line a large baking tray with parchment paper and arrange the dough balls in neat rows, ensuring they are quite close together but not touching. This proximity helps them support each other as they rise and creates a lovely soft side on the finished buns.
-
Second Prove (The Final Rise): Cover the baking tray containing your shaped buns with the tea towel once more. Return them to a warm, draft-free place for their second and final prove. This stage typically takes around 45 minutes. During this time, the buns will puff up significantly and should be touching each other, creating that satisfying, connected appearance. This final rise ensures a light and airy texture.
-
Pipe Crosses & Bake: Towards the end of the second proving time, preheat your oven to 220°C (425°F or Gas Mark 7). To prepare the cross paste, mix the plain flour, caster sugar, and water in a small bowl until you achieve a smooth, thick paste. Transfer this paste into a piping bag fitted with a small round nozzle, or simply use a strong zip-top bag with a tiny corner snipped off. Carefully and steadily pipe a cross onto the top of each risen bun. Once all buns are adorned, immediately transfer the baking tray to the preheated oven. Bake for 15-20 minutes, or until the buns are beautifully golden brown, well risen, and sound hollow when gently tapped on the bottom.
-
Glaze Immediately & Serve: The moment your magnificent hot cross buns emerge from the oven, prepare the glaze. In a small bowl, dissolve 1 tablespoon of caster sugar in 2 tablespoons of boiling water. Using a pastry brush, liberally brush this warm sugar syrup over the tops of all the hot buns. This step is crucial for imparting that signature glossy sheen and adding an extra layer of sweetness. Allow the buns to cool slightly on a wire rack before serving. For the ultimate indulgence, slice them in half, toast them lightly until fragrant, and serve with generous lashings of creamy butter. They are also heavenly with marmalade, apricot jam, or even a dollop of clotted cream.
Baker’s Tips & Tricks for Hot Cross Bun Success
- Yeast Activation: Always ensure your milk is lukewarm, not hot. Too hot will kill the yeast, and your buns won’t rise. If you’re unsure, check with a food thermometer – around 37-43°C (98-110°F) is ideal.
- Kneading is Non-Negotiable: Don’t shortcut the kneading time. This step develops the gluten structure, which is vital for the light, airy texture. A well-kneaded dough will be smooth, elastic, and pass the “windowpane test” (stretching a small piece thin enough to see light through it without tearing).
- The Perfect Proving Environment: Yeast loves warmth and hates drafts. Besides the oven or airing cupboard trick, placing the covered bowl near a sunny window or on top of a warm (but not hot) appliance can also work.
- Uniform Buns: For aesthetically pleasing and evenly baked buns, divide your dough by weight using a kitchen scale. This ensures each bun bakes consistently.
- Don’t Overbake: Overbaking can lead to dry buns. Keep an eye on them towards the end of the baking time. They should be golden brown and sound hollow.
- Customise Your Flavours: Feel free to experiment with different spices! A touch of nutmeg, allspice, or even a tiny amount of cardamom can add unique depth. Swap currants for golden raisins, chopped dried apricots, or a mix of candied peel.
- Freezing for Future Enjoyment: Hot cross buns freeze exceptionally well. Once completely cooled, wrap them individually or in batches in cling film, then place them in a freezer bag. Thaw at room temperature and refresh in a warm oven for a few minutes before serving.
Storage & Serving Suggestions
While homemade hot cross buns are undeniably at their peak freshness on the day they are baked, any leftovers can be stored in an airtight container at room temperature for up to 2-3 days. To restore their freshness, simply warm them gently in the oven or a toaster. For longer storage, they freeze beautifully for up to 3 months. Thaw them overnight in the refrigerator or at room temperature, then refresh in a warm oven until soft and fragrant.
Beyond the classic butter, these versatile buns invite a host of delicious serving suggestions. Try them with a spoonful of your favourite fruit jam, a decadent dollop of clotted cream, or even a drizzle of honey. For an interesting savoury contrast, some enjoy them with a slice of mature cheddar cheese. Paired with a steaming cup of tea or coffee, they make for an exquisite breakfast, brunch, or afternoon treat during the Easter season and beyond.