
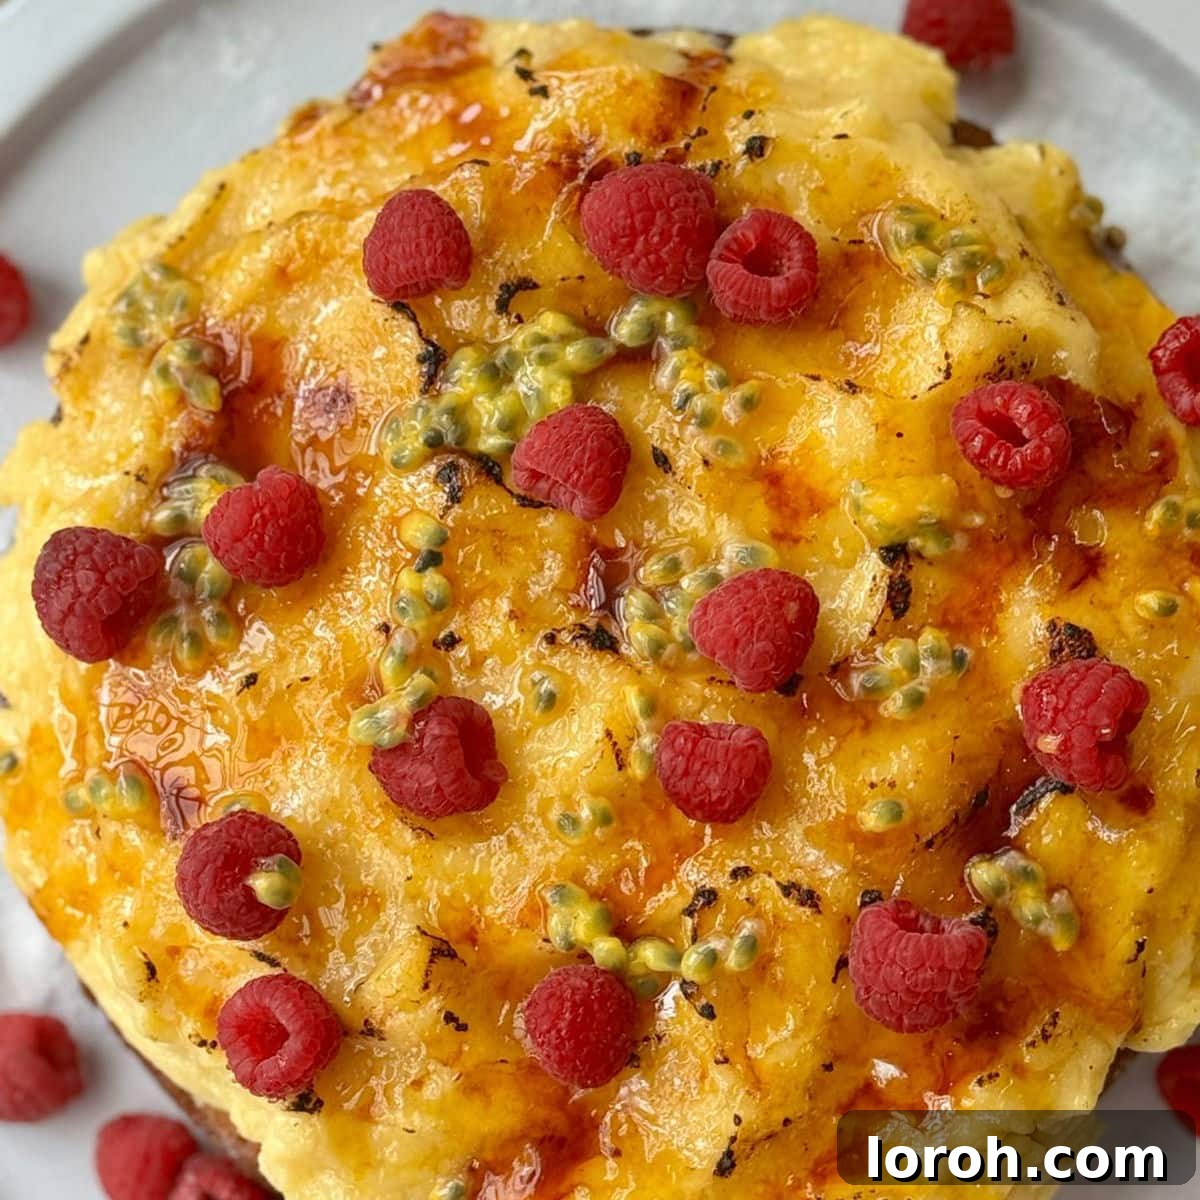
The Ultimate Crème Brûlée Cake: A Decadent Dessert Fusion That Wows
Prepare to be enchanted by this extraordinary Crème Brûlée Cake – a dessert that artfully marries the delicate textures and rich flavors of classic French crème brûlée with the comforting indulgence of a moist, fluffy cake. Each slice promises a symphony of sensations: a tender vanilla sponge soaked in a sweet drizzle, crowned with a luscious, velvety custard, and finished with that signature, satisfyingly crisp caramelized sugar topping that cracks under the slightest touch of your spoon. This show-stopping dessert looks incredibly impressive, yet it’s surprisingly simple to create, making it perfect for both seasoned bakers and ambitious beginners. Get ready to elevate your dessert game and delight your guests with this unforgettable cake!
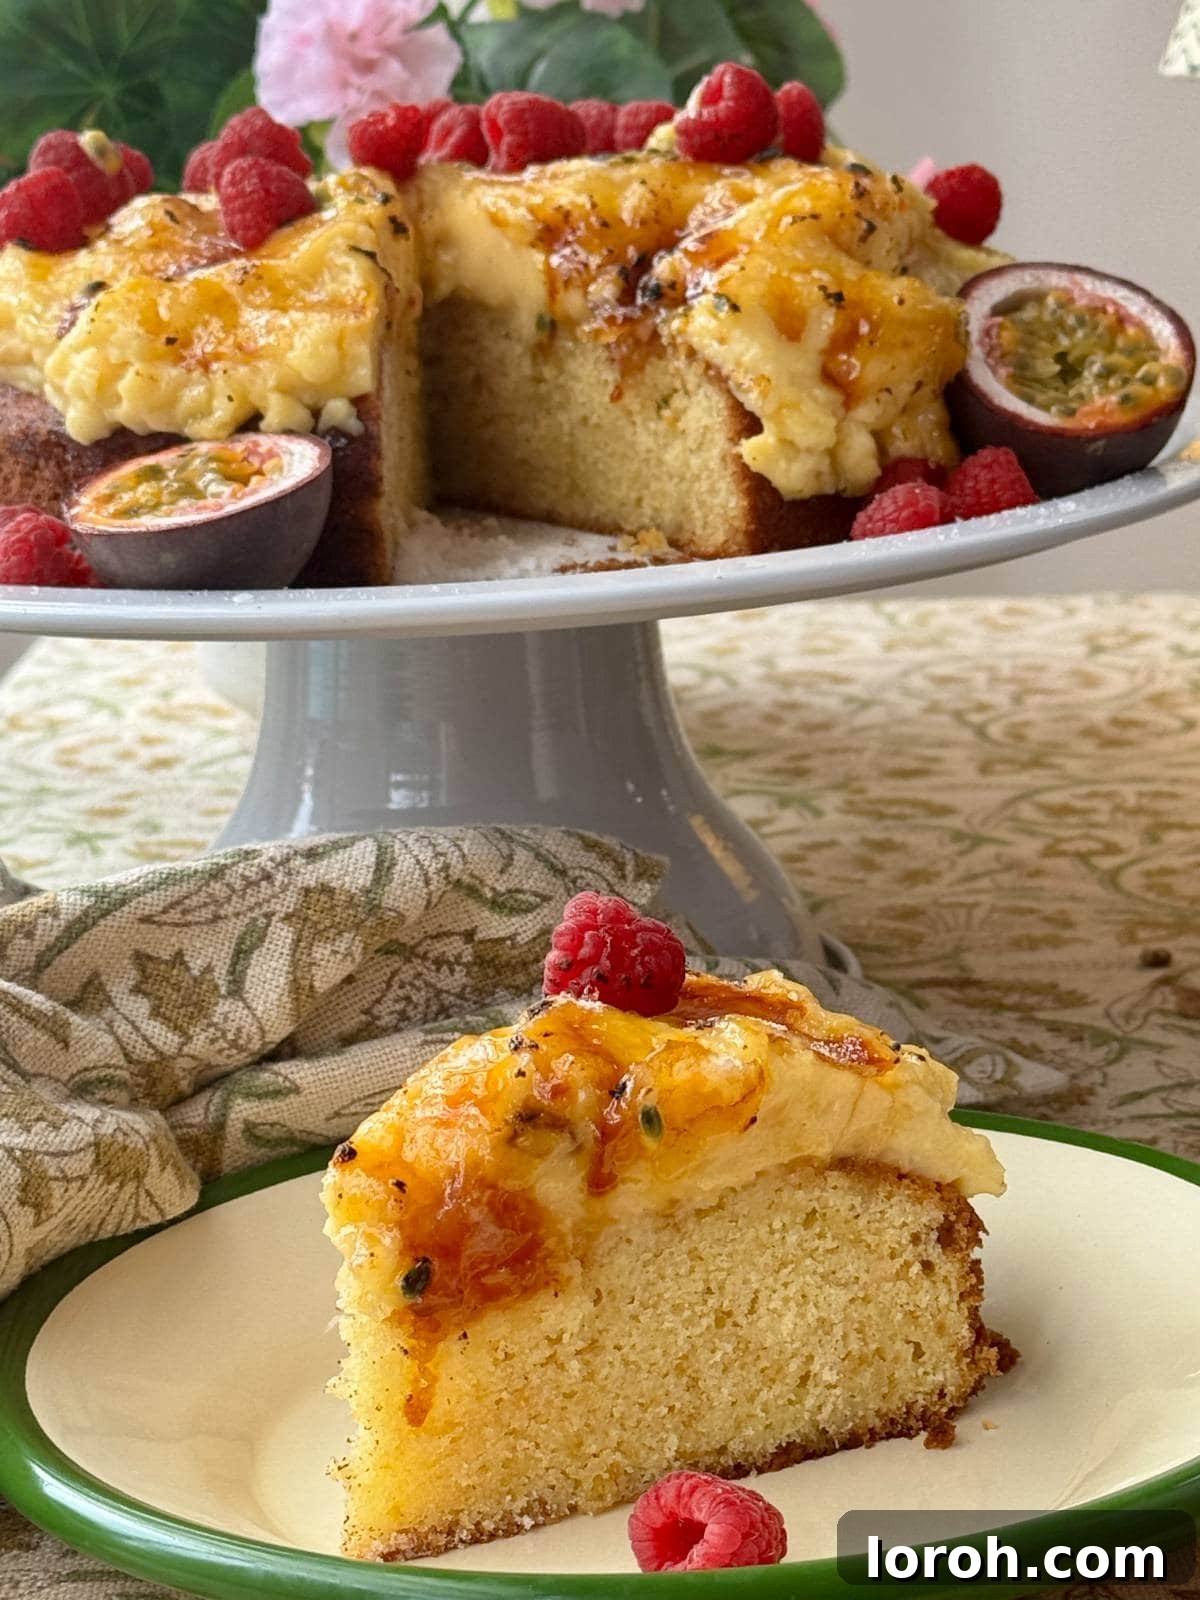
This unique recipe ingeniously combines the beloved elements of a traditional crème brûlée – the smooth vanilla custard, the satisfying crunch of burnt sugar – and transforms them into a truly magnificent cake. Imagine a soft, vanilla-infused sponge, a generous layer of rich, homemade custard, and a perfectly brûléed crust that shatters with every bite. Much like our popular crème brûlée cheesecake, this cake offers all the familiar comforts with an exciting new twist. We’ve crafted a comprehensive, step-by-step guide, complete with essential tips, creative variations, and answers to common questions, to ensure your baking success.
Table of Contents
- Why You Will Love This Crème Brûlée Cake Recipe
- Essential Ingredients for Your Crème Brûlée Cake
- Creative Substitutions and Delicious Variations
- How to Make an Easy Crème Brûlée Cake: A Step-by-Step Guide
- Expert Baking Tips for a Perfect Crème Brûlée Cake
- Frequently Asked Questions About Crème Brûlée Cake
- Other Delicious Dessert Recipes You Might Enjoy
- Easy Crème Brûlée Cake Full Recipe
Why You Will Love This Crème Brûlée Cake Recipe
This isn’t just another cake; it’s an experience designed to captivate your senses and impress your palate. Here’s why this Crème Brûlée Cake will quickly become a favorite:
- Authentic Crème Brûlée Crunch: The most enchanting feature of this cake is undoubtedly its perfectly caramelized sugar topping. Just like a classic crème brûlée, it forms a delicate, glass-like crust that produces an irresistible crackling sound and texture when you break through it with your spoon. This ensures an authentic crème brûlée experience in every bite. The sweet, slightly bitter caramel contrasts beautifully with the creamy custard and soft cake, creating a multi-layered sensory delight.
- Harmonious Textures and Flavors: Indulge in the perfect marriage of textures: a light, moist vanilla sponge that’s been subtly sweetened with a condensed milk drizzle, beautifully complemented by a thick, silky-smooth homemade vanilla custard. The interplay of soft cake, creamy custard, and crunchy caramel creates a truly exquisite dessert that is both comforting and sophisticated. Each component is carefully balanced to ensure no single flavor overpowers another.
- Impressively Easy to Make: Despite its sophisticated appearance and gourmet taste, this Crème Brûlée Cake is surprisingly straightforward to prepare. We’ve broken down each step into simple, manageable instructions, making it accessible even for novice bakers. You’ll be amazed at how easily you can create such an elegant dessert that looks like it came straight from a patisserie, all from the comfort of your own kitchen.
- Perfect for Any Celebration: Whether you’re hosting a dinner party, celebrating a birthday, an anniversary, or simply looking for an extraordinary treat to elevate a casual gathering, this cake is guaranteed to be a crowd-pleaser. Its unique appeal and stunning presentation make it an ideal centerpiece for any special occasion, leaving a lasting impression on your guests and sparking conversation. It’s a dessert that feels both familiar and excitingly new.
Essential Ingredients for Your Crème Brûlée Cake
Crafting the perfect Crème Brûlée Cake starts with understanding the role of each ingredient. Below, we detail the key components that come together to create this magnificent dessert. Remember, for the full, detailed recipe with exact measurements, please scroll down to the printable recipe card at the bottom of this page.
For the Cake:
- Plain Flour (All-Purpose Flour): This forms the foundational structure of our cake. Ensure it’s accurately measured, preferably by weight, to achieve the desired light and tender crumb. Over-measuring can lead to a dense cake.
- Baking Powder: Our primary leavening agent, working synergistically with the buttermilk to give the sponge its wonderful rise and airy texture. It creates carbon dioxide bubbles that expand during baking.
- Salt: A crucial ingredient that balances the sweetness and enhances all the other flavors in the cake, preventing it from tasting flat.
- Caster Sugar (Superfine Sugar): This fine-grained sugar dissolves beautifully into the batter, contributing to a smooth texture and delicate sweetness without adding chewiness. Granulated sugar can be used as a substitute if superfine is unavailable, though it may result in a slightly coarser crumb.
- Unsalted Butter: Room temperature butter is absolutely essential for creaming effectively with sugar. This process incorporates tiny air pockets, which are vital for a light and fluffy cake. Using unsalted butter allows you to control the salt content precisely.
- Large Eggs: Also at room temperature, eggs bind the ingredients, add richness, moisture, and contribute significantly to the cake’s structure and overall texture. Room temperature eggs emulsify better with the butter.
- Vanilla Extract: Provides the foundational warm and inviting vanilla flavor for the sponge. Opt for a good quality pure vanilla extract or even a vanilla bean paste for an elevated taste experience.
- Buttermilk: The acidity in buttermilk reacts with baking powder to create a tender, moist, and slightly tangy crumb that enhances the cake’s depth of flavor. If you don’t have buttermilk, you can easily make a substitute by mixing 230ml of regular milk (dairy or non-dairy) with 1 tablespoon of lemon juice or white vinegar and letting it sit for 5-10 minutes until it slightly curdles.
For the Drizzle:
- Double Cream (Heavy Cream): Adds richness and luxurious moisture to the freshly baked cake, making it incredibly tender and melt-in-your-mouth.
- Condensed Milk: A sweet, thick, and syrupy milk that soaks into the warm cake, infusing it with extra moisture and a delightful, subtle sweetness that complements the custard perfectly. Ensure you’re using sweetened condensed milk, not evaporated milk, as their consistencies and sweetness levels are very different.
For the Custard:
- Egg Yolks: The very heart of the custard, providing its signature rich golden color, incredibly creamy texture, and classic custardy flavor. Separating them carefully to avoid any white is key for a smooth finish.
- Caster Sugar: Sweetens the custard to perfection and helps achieve its smooth, silken consistency.
- Plain Flour & Cornflour (Cornstarch): These two ingredients act as crucial thickening agents, giving the custard its luscious, thick, and pudding-like consistency. The combination helps prevent the custard from becoming too runny or too starchy.
- Milk: The liquid base for the custard. Using full-fat whole milk will yield the richest, most indulgent results, contributing to a superior texture and mouthfeel.
- Vanilla Paste: Offers a more intense and visible vanilla flavor, complete with those beautiful, tiny flecks of vanilla bean. Vanilla extract can be used as an alternative, but the paste provides a more gourmet touch.
To Finish:
- Caster Sugar: Sprinkled generously and evenly over the cooled custard, this sugar will be precisely torched to create the signature crisp, glass-like caramel topping that defines crème brûlée.
- Fresh Raspberries & Passion Fruit Pulp: These are optional but highly recommended garnishes. They add a vibrant burst of fresh, tart flavor, beautiful contrasting color, and a touch of elegant sophistication to the finished cake, cutting through the richness.
Creative Substitutions and Delicious Variations
While the classic Crème Brûlée Cake is a masterpiece on its own, don’t hesitate to get creative! These suggestions can help you adapt the recipe to your taste, dietary needs, or simply to try something new and exciting:
- Sugar Swaps for the Cake & Brûlée: If caster sugar (superfine sugar) isn’t readily available, granulated sugar can be used in both the cake batter and for the brûlée topping. For the topping, just ensure you sprinkle it very evenly to achieve consistent caramelization, as its larger crystals might take a moment longer to melt.
- Layered Crème Brûlée Cake: For an even grander presentation and an extra indulgent experience, consider making a layered cake. Bake the sponge in two separate 8-inch (20cm) cake tins for approximately 25-30 minutes, then cool them completely. Once assembled, you can even slice each cake layer horizontally to create four thinner layers if you wish. Fill the layers generously with your prepared custard before topping the entire cake with more custard and the iconic brûlée crust. This adds an extra dimension of creaminess and elegance, making it perfect for truly special occasions.
- Zesty Lemon Brûlée Cake: Infuse a bright, citrusy twist by adding the finely grated zest of one or two lemons to both the cake batter and the custard. The vibrant lemon flavor will beautifully cut through the richness of the cake and custard, providing a delightful and refreshing contrast.
- Chocolate Lover’s Twist: Transform this dessert for chocolate enthusiasts! Incorporate 2-3 tablespoons of unsweetened cocoa powder into the cake batter along with the flour for a rich chocolate sponge. For an extra touch, you could even add a hint of orange zest to the custard for a sophisticated chocolate-orange brûlée cake.
- Spiced Autumn Cake: For a cozy, seasonal variation, add a pinch of warm spices like cinnamon, nutmeg, and a whisper of ground ginger to the cake batter. These spices pair wonderfully with the creamy vanilla custard, evoking the comforting flavors of autumn and winter.
- Individual Portions (Crème Brûlée Cupcakes): Instead of one large cake, bake the sponge batter in muffin tins lined with paper cases for individual crème brûlée cupcakes. Once cooled, spoon a generous dollop of custard on top of each cupcake and torch them for adorable, single-serving desserts that are perfect for parties. Adjust baking time accordingly (typically around 18-22 minutes for cupcakes).
- Dairy-Free Option (with caveats): While adapting a traditional dairy-rich recipe can be challenging, you could experiment with plant-based milks and creams. For the cake, use a dairy-free milk and vinegar substitute for buttermilk, and a good quality dairy-free butter substitute. For the custard, full-fat coconut milk or a rich oat milk can be used, adjusting the thickeners (flour/cornflour) as needed as plant milks can vary in consistency. Be aware that the flavor and texture will differ from the original dairy version.
- Coffee Infusion: Add 1-2 teaspoons of instant coffee powder (or espresso powder) dissolved in a tablespoon of hot water to the custard for a subtle coffee note that complements the vanilla beautifully.
How to Make an Easy Crème Brûlée Cake: A Step-by-Step Guide
Creating this magnificent Crème Brûlée Cake is simpler than you might imagine, especially when you follow these detailed steps. Each stage is crucial for building the complex layers of flavor and texture that make this dessert so special. For exact measurements and a printable version, please refer to the full recipe card at the bottom of this page.
Part 1: Baking the Moist Vanilla Sponge
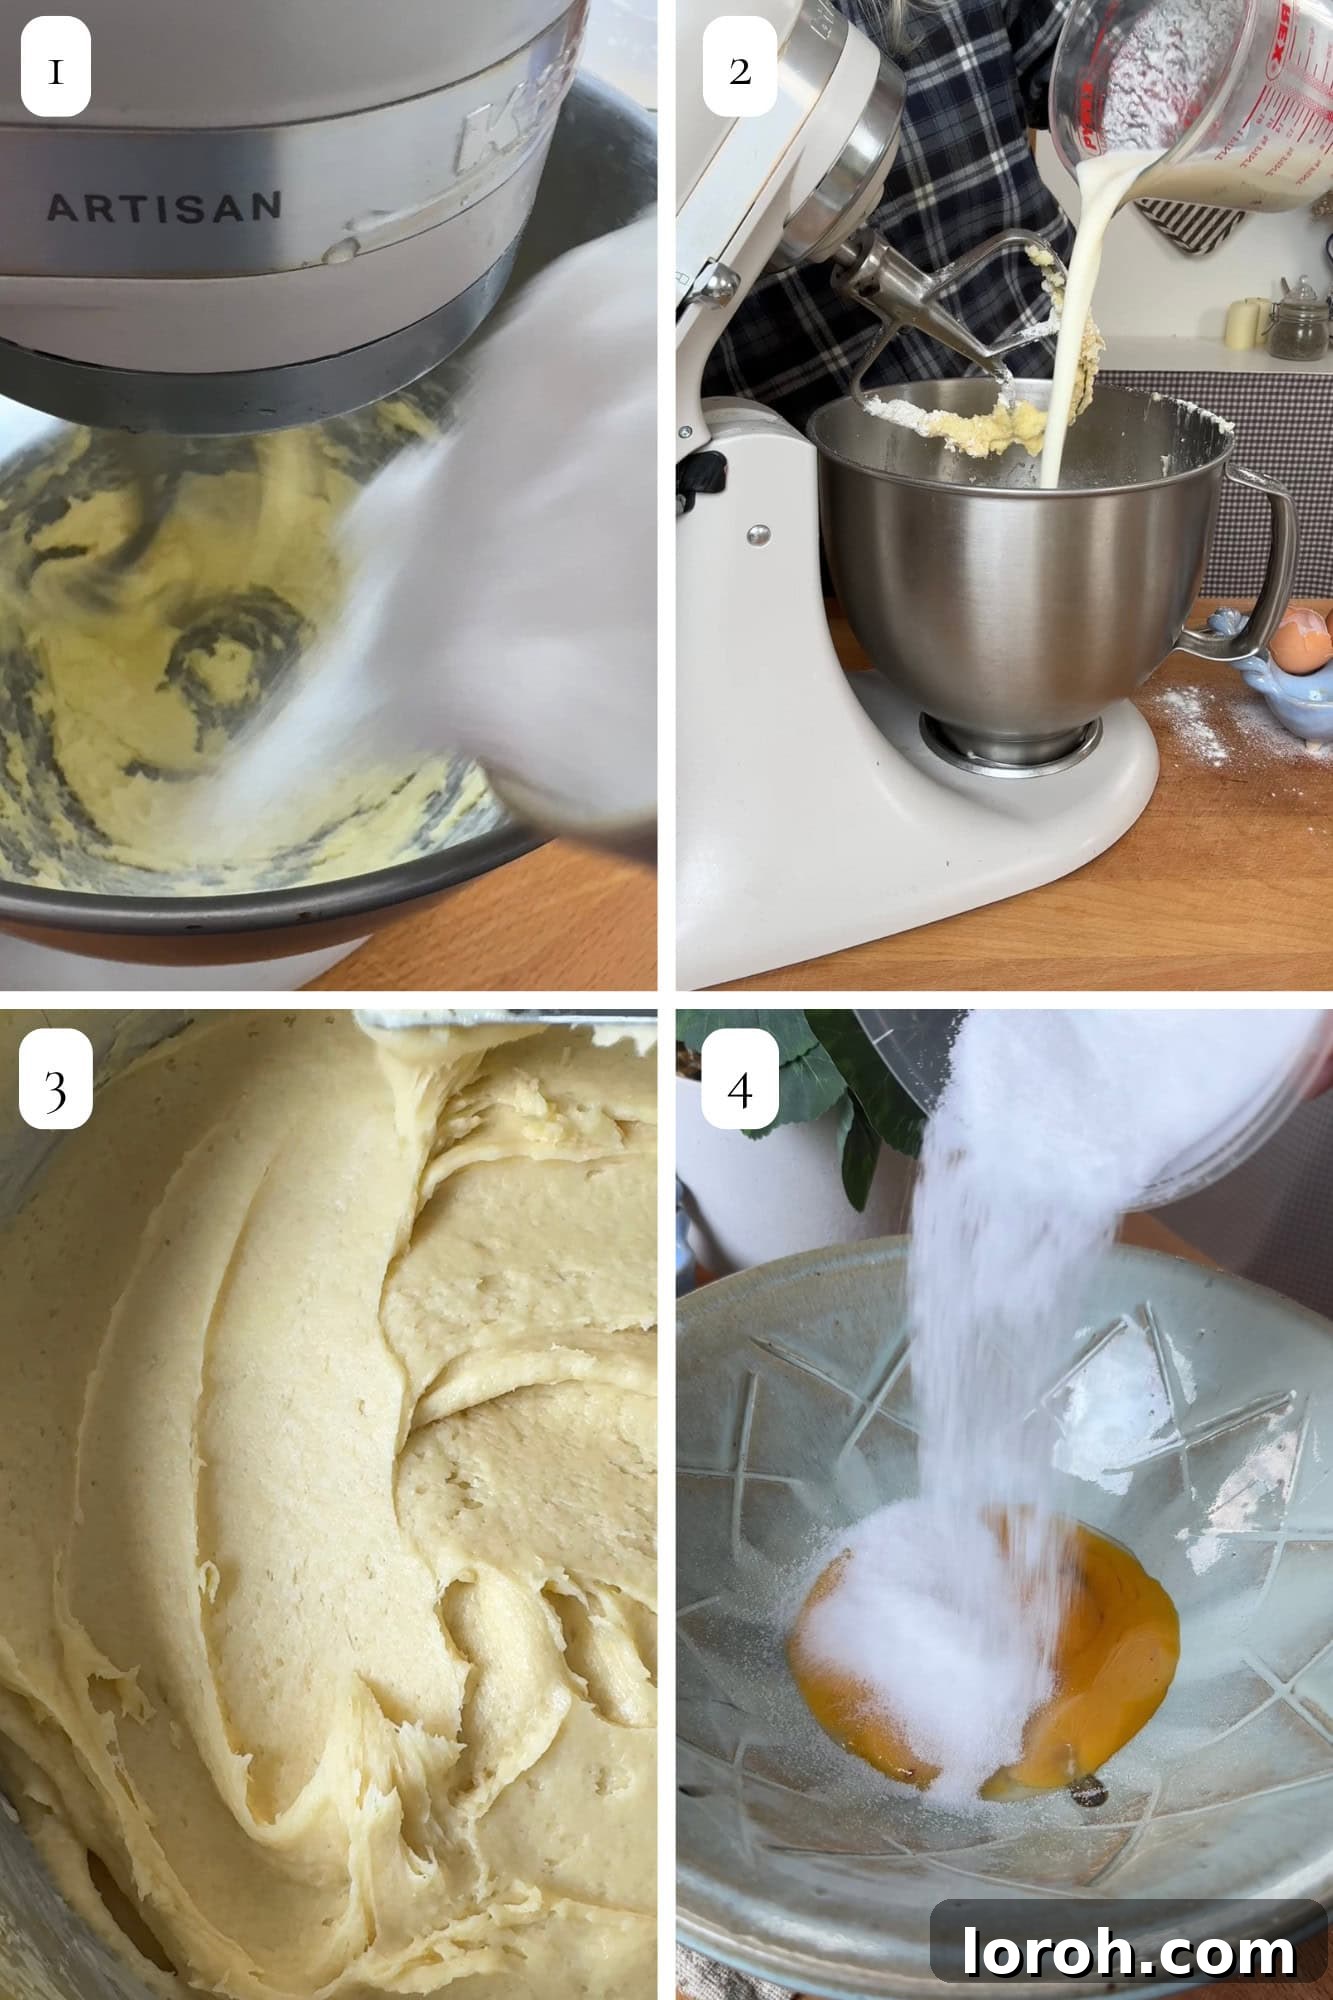
Step ONE: Prepare the Batter Base. Begin by preheating your oven to 170°C (340°F) using the fan-assisted setting. Prepare a 10-inch (25cm) round cake tin by generously greasing it and lining the bottom with a circle of baking parchment. In a large mixing bowl, using an electric mixer fitted with a paddle attachment, cream together the softened unsalted butter and caster sugar until the mixture is visibly light, fluffy, and pale in color. This process typically takes about 3-5 minutes and is crucial for incorporating air into the cake, which contributes to its light and tender texture.
Step TWO: Incorporate Wet and Dry Ingredients. Add the large eggs one at a time, ensuring each egg is fully beaten and emulsified into the butter mixture before adding the next. This prevents curdling and keeps the batter smooth. Next, pour in the buttermilk (or your homemade milk and lemon mixture) and vanilla extract, mixing on low speed until just smooth. In a separate, medium-sized bowl, whisk together the plain flour, baking powder, and salt. Gradually add these dry ingredients to your wet mixture, mixing gently with a spatula or on the lowest speed of your mixer until *just* combined. Be careful not to overmix, as excessive mixing can develop the gluten in the flour and result in a dense, tough cake.
Step THREE: Bake the Perfect Sponge. Carefully pour the prepared cake batter into your lined 10-inch cake tin, using a spatula to spread it evenly and smooth the top. Bake for approximately 40 minutes, or until the cake appears golden brown, feels firm and springy to the touch when lightly pressed in the center, and a wooden skewer inserted into the middle comes out clean with no wet batter attached. Once baked, remove from the oven and immediately prepare for the drizzle while the cake is still warm.
Part 2: Crafting the Silky Vanilla Custard
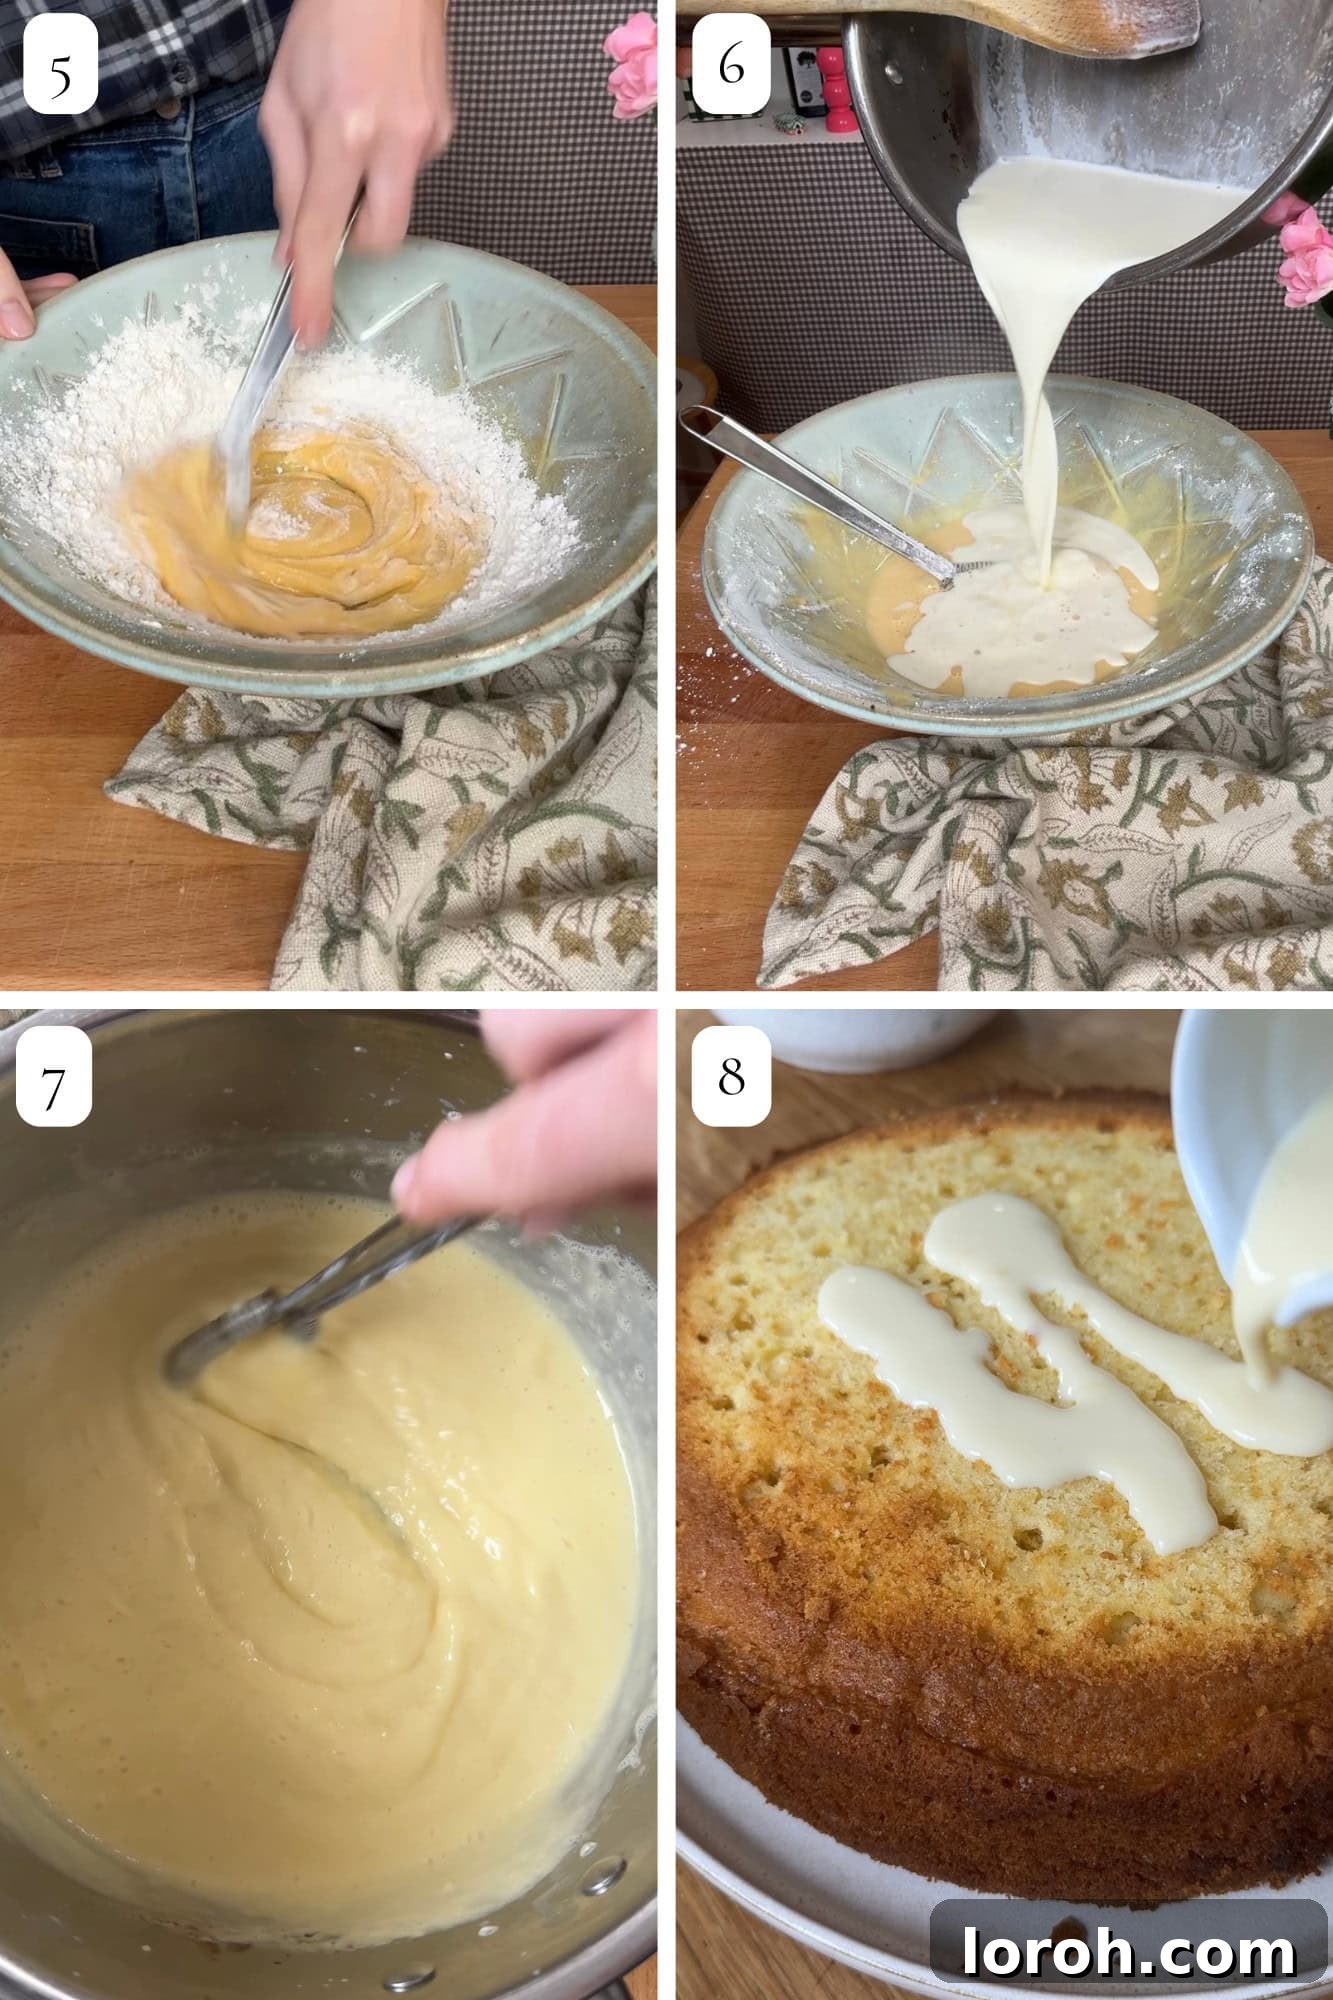
Step FOUR: Prepare the Custard Base. In a clean, heatproof bowl, vigorously whisk together the egg yolks, caster sugar, and vanilla paste for about a minute until the mixture becomes pale, creamy, and slightly thickened. This process helps to aerate the yolks and dissolve the sugar.
Step FIVE: Thicken the Mixture. Sift in the plain flour and cornflour (cornstarch) into the egg yolk mixture. Whisk thoroughly until the mixture is completely smooth, ensuring there are absolutely no lumps. This step is essential for achieving a perfectly silky and lump-free custard texture.
Step SIX: Temper the Eggs. In a heavy-bottomed saucepan, gently heat the milk over medium heat, stirring occasionally, until it reaches a gentle simmer – you’ll see small bubbles forming around the edges. Do not let it come to a vigorous boil. Slowly and gradually pour about one-third of the hot milk into your egg yolk mixture, whisking constantly and vigorously as you pour. This process, known as tempering, slowly raises the temperature of the eggs, preventing them from scrambling. Once combined, pour the tempered egg mixture back into the saucepan with the remaining hot milk.
Step SEVEN: Cook and Cool the Custard. Return the saucepan to medium heat and cook, whisking continuously and scraping the bottom and sides of the pan, until the custard visibly thickens and becomes smooth, glossy, and coats the back of a spoon. This usually takes 5-8 minutes. Immediately remove from heat and pour the cooked custard into a clean bowl. To prevent a skin from forming on the surface as it cools, press a piece of cling film directly onto the surface of the custard. Allow it to cool completely at room temperature, then transfer to the refrigerator to chill thoroughly for at least 4 hours, or ideally overnight, until firm and completely set.
Part 3: The Secret Drizzle and Final Assembly
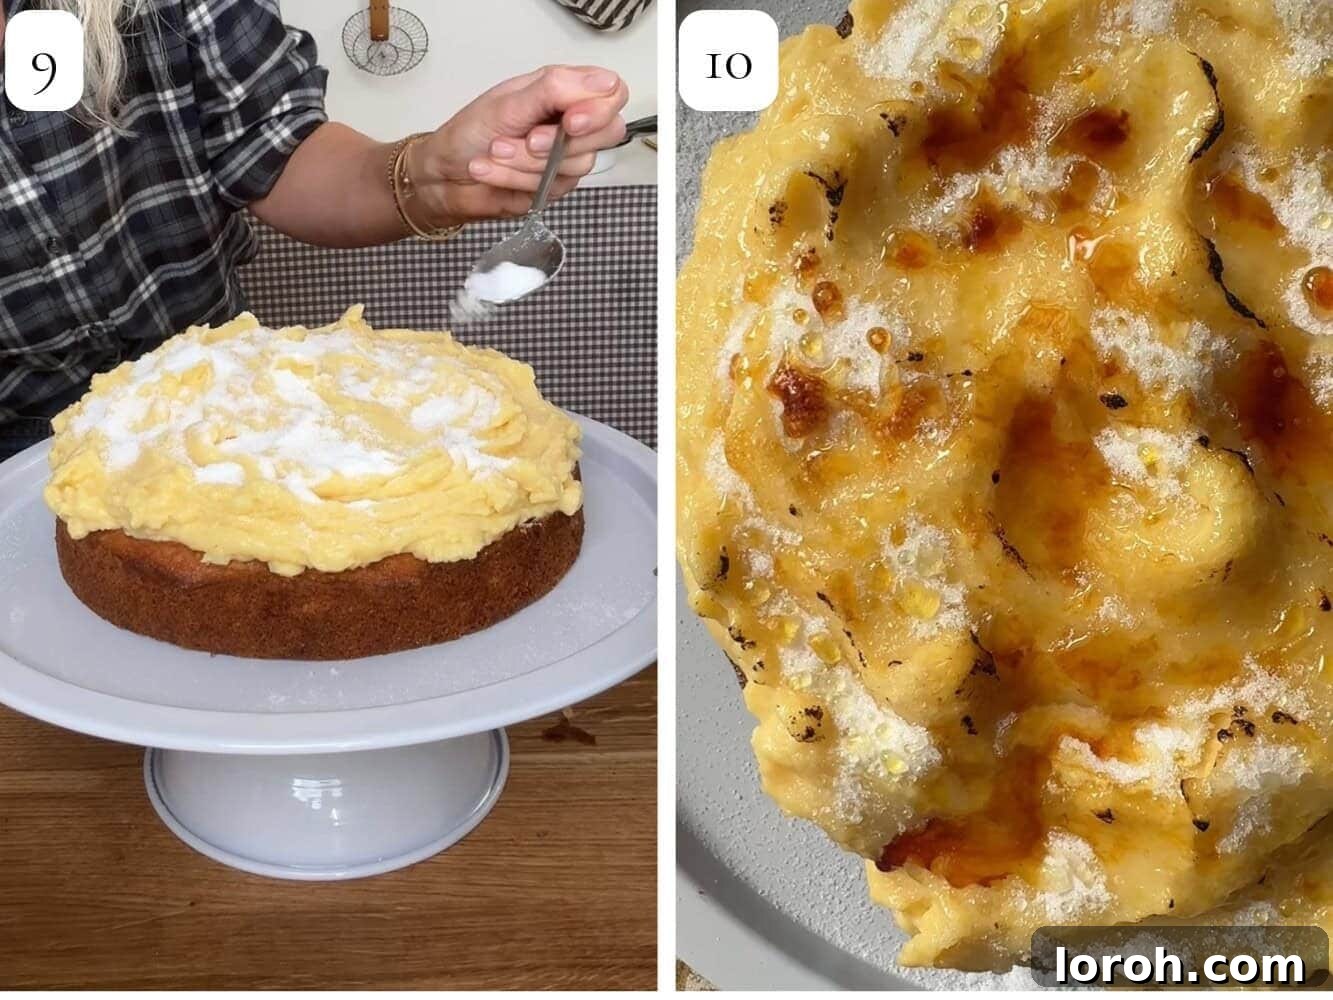
Step EIGHT: Drizzle the Warm Cake. As soon as the cake comes out of the oven, while it’s still warm and in its tin, use a skewer or fork to poke holes all over its surface, similar to making a lemon drizzle cake. In a small bowl, whisk together the double cream and condensed milk until well combined and smooth. Pour this delicious drizzle mixture evenly over the entire warm, poked cake, allowing it to soak into the sponge. This adds incredible moisture and flavor. Leave the cake in its tin to cool down completely, preferably to room temperature, before attempting to remove it.
Step NINE: Apply Custard and Sugar. Once both the cake and the custard are fully cooled and the custard is thick and firmly set, carefully remove the cake from its tin and transfer it to your chosen serving platter or cake stand. Spread a generous, thick layer of the chilled vanilla custard evenly across the entire top surface of the cake. For an appealing rustic texture and visual interest, use the back of a spoon to create small divots and dips in the custard surface. Evenly sprinkle 4-5 tablespoons of caster sugar over the entire custard layer, ensuring a consistent and complete coating for the brûlée.
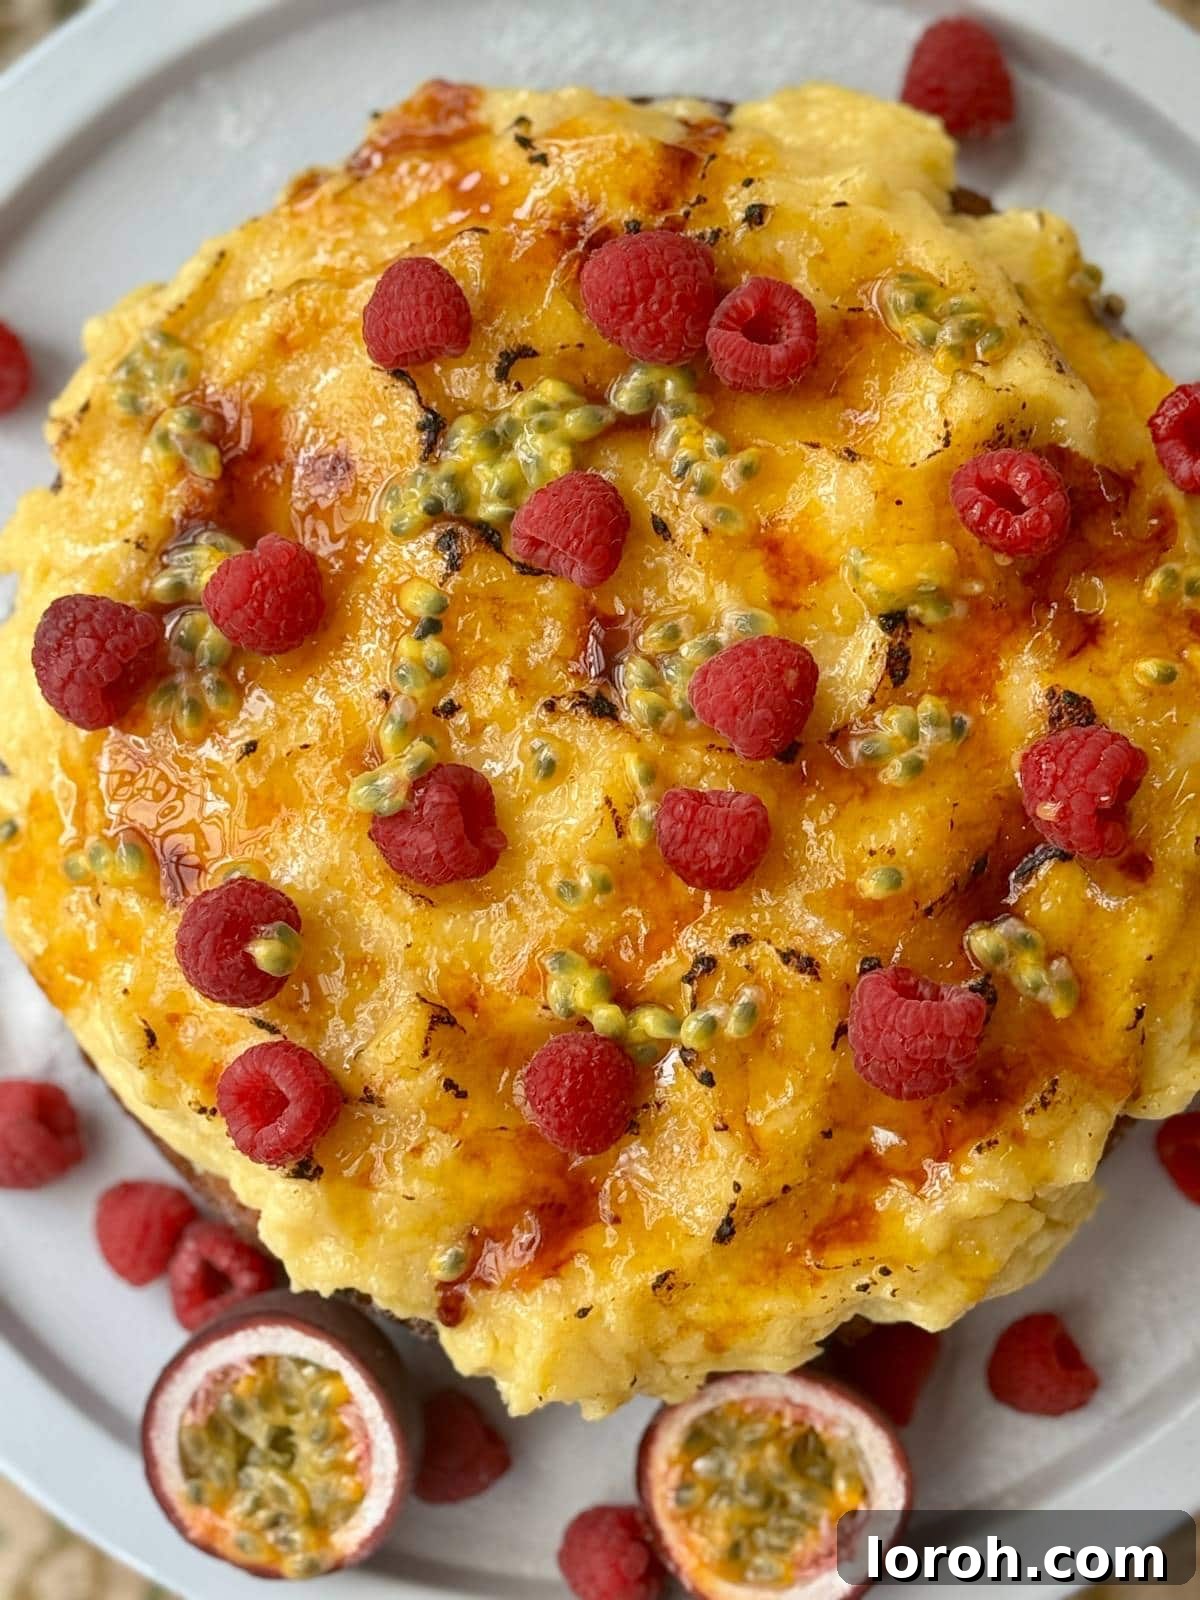
Step TEN: The Perfect Brûlée Finish. Now for the magic! Using a kitchen blowtorch (or your oven’s broiler, with extreme caution), caramelize the sugar topping until it melts, bubbles, and turns a beautiful golden-brown, forming a hard, crisp crust. Move the torch continuously in small circles to avoid burning any single spot. As the sugar cools slightly, it will harden and create that signature crack, providing that essential crème brûlée experience. Garnish your magnificent Crème Brûlée Cake with fresh raspberries and a vibrant drizzle of passion fruit pulp for an exquisite final touch. Serve immediately and enjoy the delightful crack and sublime flavors!
Expert Baking Tips for a Perfect Crème Brûlée Cake
Achieving crème brûlée cake perfection is easier with a few insider tips and tricks. These pieces of advice will help you navigate common baking challenges and ensure your dessert turns out flawlessly every time:
- The Power of the Blowtorch: A kitchen blowtorch is highly recommended for achieving the most even, professional, and consistent crème brûlée topping. Its direct, concentrated heat allows for precise caramelization without significantly heating the custard below. If you don’t have a blowtorch, your oven’s grill (broiler) can be used as an alternative, but requires extreme vigilance. Place the cake on the highest rack, switch to high grill setting, and watch it *very* carefully through the oven door, turning the cake if necessary, until golden. Be aware that this method is less precise and carries a higher risk of burning the sugar or melting the custard if left too long.
- Chilling is Crucial: Proper chilling of the custard is absolutely non-negotiable for this recipe. It needs at least 4 hours in the refrigerator, and ideally overnight, to set completely and firm up. A well-chilled custard will be thick, stable, and easy to spread across the cake without making a mess, ensuring a beautiful, even base for your brûlée topping. Resist the urge to rush this step – patience will be rewarded!
- Room Temperature Ingredients: For the cake, ensure your butter and eggs are at proper room temperature. This allows them to emulsify properly with the sugar, creating a smooth, homogenous batter that traps air effectively during the creaming process. This trapped air is what gives your cake a lighter, more tender, and uniform crumb. Cold ingredients can result in a lumpy batter and a denser cake.
- Don’t Overmix the Batter: Once you add the dry ingredients (flour, baking powder, salt) to the wet ingredients, mix only until just combined. Overmixing develops the gluten in the flour, which can lead to a dense, tough, and chewy cake rather than a tender, delicate sponge. Mix on the lowest speed or by hand with a spatula until no streaks of flour remain.
- Level the Cake: For a professional finish and an impeccably even layer of custard, ensure your baked cake is level. If your cake domes slightly in the middle during baking, once it’s completely cooled, use a long, serrated knife to carefully trim off the domed top to create a flat, even surface. This small step makes a big difference in the final appearance.
- Torch Just Before Serving: The iconic, satisfying crack of the brûlée topping is at its absolute best when fresh. While the caramel layer will hold its crispness for a few hours after being torched, for the most satisfying auditory and textural experience, it is highly recommended to torch the sugar just 15-30 minutes before you plan to serve the cake. This ensures maximum crispness and warmth from the freshly torched sugar.
- Quality Vanilla Matters: Since vanilla is a star flavor in both the cake and the custard, invest in good quality pure vanilla extract or, even better, vanilla bean paste. The difference in depth, aroma, and overall taste compared to imitation vanilla is truly remarkable and will elevate your entire dessert.
- Use Fresh Eggs: Especially for the custard, using fresh, high-quality eggs will contribute to a richer flavor and better texture.
Frequently Asked Questions About Crème Brûlée Cake
Got questions? We’ve got answers! Here are some common queries about making and enjoying this delectable Crème Brûlée Cake:
How long will a crème brûlée cake keep in the fridge?
The assembled Crème Brûlée Cake keeps wonderfully for up to 48 hours when stored in the refrigerator. For the best crispness of the caramel topping, we recommend storing it uncovered for the first hour after brûléeing, allowing the sugar to fully harden and excess moisture to evaporate. Afterward, loosely tent with foil or a cake dome to prevent it from absorbing moisture from the fridge. While the caramel top may soften slightly over time, the flavors of the cake and custard will remain delicious and enjoyable.
Can you blow torch sugar on chilled custard?
Absolutely, and in fact, it is the ideal method! The custard needs to be thoroughly chilled and firm before you apply the sugar and blowtorch it. A cold custard base helps prevent it from melting or becoming runny under the direct heat of the torch, ensuring a clean, crisp, and beautifully caramelized sugar layer. Furthermore, a well-chilled custard makes spreading and decorating much easier and results in a more stable final product.
Why did my custard curdle and how do I fix it?
Custard typically curdles when it gets too hot too quickly, causing the egg proteins to seize and separate. To prevent this, ensure you whisk continuously and vigorously while cooking the custard, and especially when tempering the eggs with hot milk (adding the hot milk gradually to the egg yolks). If your custard does curdle slightly, don’t panic! Immediately remove it from the heat, strain it through a fine-mesh sieve into a clean bowl, and whisk vigorously. Adding a splash of cold milk or cream (1-2 tablespoons) and whisking again can sometimes help bring it back to a smoother consistency. While it might not be perfectly silky, this can often salvage the custard.
Can I make the cake or custard ahead of time?
Yes, both major components of this recipe can be prepared in advance to simplify your baking process. The sponge cake can be baked up to 2 days ahead of time; once completely cooled, wrap it tightly in cling film (plastic wrap) and store it in the fridge. The custard can also be made 1-2 days in advance and kept in the fridge, with cling film pressed directly onto its surface to prevent a skin from forming. For the best results and that perfect crisp crack, we highly recommend assembling the cake and torching the sugar just before serving.
What if I don’t have a blowtorch?
While a kitchen blowtorch offers the most controlled and precise way to caramelize the sugar, you can use your oven’s broiler (grill setting) as an alternative. Place your cake on a rack in the upper third of the oven. Turn the broiler to high and watch it *very* closely through the oven door. The sugar will brown quickly, often in less than a minute. Remove the cake as soon as the sugar is golden and bubbly. Be extremely vigilant, as sugar can burn very easily, and the heat from the broiler might warm the custard more than desired, potentially softening it slightly.
Can I use store-bought custard for this recipe?
While homemade custard provides the best flavor and texture, if you’re short on time, you could use a good quality store-bought vanilla custard or pastry cream. Ensure it’s thick enough to spread and chill it thoroughly before use. However, for the true Crème Brûlée Cake experience, we highly recommend making the custard from scratch as outlined in the recipe, as it significantly enhances the overall taste and quality.
Other Delicious Dessert Recipes You Might Enjoy
If you’re a fan of this delightful Crème Brûlée Cake and love creating impressive desserts that bring joy to your table, you’ll surely enjoy these other tried-and-true recipes. They offer a range of flavors and styles, perfect for expanding your baking repertoire!
Easy Baking Recipes
Zesty Lemon Loaf Cake
A classic, incredibly moist lemon loaf cake topped with a tangy lemon drizzle, making it perfect for afternoon tea, a light dessert, or a bright breakfast treat. Simple to make and always a crowd-pleaser.
Easy Baking Recipes
Decadent Chocolate Mud Cake with Malted Whipped Cream
Indulge in this unbelievably rich, moist chocolate mud cake topped with a dreamy, light malted whipped cream. It’s a true chocoholic’s delight and a show-stopping dessert for any occasion.
Easy Dessert Recipes
The Best Salted Caramel Cheesecake
Experience pure bliss with this incredibly creamy and rich salted caramel cheesecake. It strikes the perfect balance of sweet and savory, with a luscious texture that melts in your mouth.
Easy Baking Recipes
Irresistibly Easy Biscoff Cake
A simple yet incredibly flavorful cake featuring the beloved, spiced taste of Biscoff cookies in every bite. This cake is quick to prepare and a guaranteed hit for any Biscoff lover.
If you tried this Crème Brûlée Cake or any other recipe on the site, please do leave a rating or comment below and let us know how it went! Your feedback is invaluable and helps us improve our recipes.
Easy Crème Brûlée Cake
This Crème Brûlée Cake is surprisingly easy to make and utterly delicious. It features a soft vanilla sponge generously soaked with a condensed milk drizzle, crowned with a thick layer of homemade vanilla custard, and finished with a perfectly brûléed sugar crust that shatters beautifully, just like a classic crème brûlée.
Prep Time: 1 hr
Cook Time: 40 mins
Total Time: 1 hr 40 mins (Excludes chilling time for custard)
Servings: 10 servings
Ingredients
For the cake:
- 280 g plain flour (all-purpose)
- 2 tsp baking powder
- ½ tsp salt
- 250 g caster sugar (superfine)
- 160 g unsalted butter, room temperature
- 3 large eggs, room temperature
- 1 tbsp vanilla extract
- 230 ml buttermilk (or 230ml milk mixed with the juice of half a lemon)
For the drizzle:
- 2 tbsp double cream (heavy cream)
- 2 tbsp condensed milk
For the custard:
- 8 egg yolks
- 100 g caster sugar (superfine)
- 50 g plain flour (all-purpose)
- 4 tsp cornflour (cornstarch)
- 560 ml milk (full-fat recommended)
- 2 tsp vanilla paste
To finish:
- 4-5 tbsp caster sugar, for the brûlée topping
- Fresh raspberries
- Fresh passion fruit pulp
Instructions
For the cake:
- Preheat your oven to 170°C (340°F) fan-assisted. Grease and line a 10-inch (25cm) round cake tin.
- If you don’t have buttermilk, combine 230ml milk with the juice of half a lemon or white vinegar and set aside for 5-10 minutes until slightly curdled.
- In a large mixing bowl, cream the softened butter and caster sugar together using an electric mixer until the mixture is light, fluffy, and pale, about 3-5 minutes.
- Add the eggs one at a time, beating well after each addition until fully incorporated. Pour in the buttermilk (or milk/lemon mixture) and vanilla extract, then mix again until just smooth.
- In a separate bowl, whisk together the plain flour, baking powder, and salt.
- Gradually add the dry ingredients to the wet ingredients. Mix gently on low speed or with a spatula until just combined. Be careful not to overmix to keep the cake tender.
- Pour the cake batter into the prepared tin and bake for approximately 40 minutes, or until a skewer inserted into the center comes out clean and the cake is firm to the touch.
Make the custard:
- In a heatproof bowl, whisk together the egg yolks, caster sugar, and vanilla paste for about a minute until the mixture is pale and creamy.
- Sift in the plain flour and cornflour. Whisk thoroughly until the mixture is completely smooth and free of lumps.
- Heat the milk in a saucepan over medium heat until it reaches a gentle simmer. Do not bring it to a rolling boil.
- Slowly pour about one-third of the hot milk into the egg yolk mixture, whisking constantly and vigorously to temper the eggs. Then, pour the tempered egg mixture back into the saucepan with the remaining hot milk.
- Return the saucepan to medium heat and cook, whisking constantly, until the custard thickens significantly and becomes smooth, glossy, and coats the back of a spoon.
- Immediately pour the cooked custard into a clean bowl. Press cling film directly onto the surface of the custard to prevent a skin from forming as it cools. Allow it to cool completely at room temperature, then refrigerate for at least 4 hours, or overnight, until thoroughly chilled and firm.
For the drizzle:
- As soon as the cake comes out of the oven (while still warm), use a skewer or fork to poke holes all over its surface.
- In a small bowl, mix together the double cream and condensed milk until well combined.
- Pour this cream and condensed milk mixture evenly over the warm, poked cake. Allow the cake to cool completely in its tin before removing.
To assemble:
- Once both the cake and custard are fully cooled and the custard is thick and set, carefully remove the cake from its tin and place it on your serving platter.
- Spread a generous, thick layer of the chilled vanilla custard across the top of the cake. Use the back of a spoon to create small decorative divots and dips on the custard surface.
- Evenly sprinkle 4-5 tablespoons of caster sugar over the entire custard layer, ensuring a consistent and complete coating.
- Using a kitchen blowtorch, caramelize the sugar until it melts, bubbles, and turns a beautiful golden-brown, forming a hard, crisp crust. Move the torch continuously to prevent burning. As the sugar cools, it will harden and create that signature crack.
- Garnish your Crème Brûlée Cake with fresh raspberries and a vibrant drizzle of passion fruit pulp for an exquisite finish. Serve immediately to enjoy the perfect crack!
Video
Watch the video above for a visual guide to making this delicious recipe.
Notes
- Storage: Store the assembled cake in the fridge. For the first hour after brûléeing, keep it uncovered to maintain the caramel’s crispness. Afterward, loosely tent it with foil or a cake dome for up to 2 days. The caramel topping may soften slightly over time, but the cake will still be delicious.
- Freezing: Do not freeze the fully assembled cake. However, the sponge cake can be frozen on its own. Once completely cooled, wrap it tightly in cling film, then in foil, and freeze for up to 3 months. Defrost at room temperature, then add the soaking drizzle, custard, and brûlée topping fresh before serving.
- Make Ahead: The sponge can be baked up to 2 days in advance and kept wrapped in the fridge. The custard can also be made 1-2 days ahead and stored in the fridge with cling film pressed directly onto its surface. For the best results and the perfect crisp crack, assemble the cake and torch the sugar just before serving.
- Don’t Overmix: When combining the wet and dry ingredients for the cake batter, mix only until just combined. Overmixing can develop the gluten in the flour, resulting in a dense and tough cake instead of a soft and tender sponge.
- Torch Just Before Serving: The iconic brûlée layer is at its very best when freshly torched. While it will remain crisp for a few hours, for the most satisfying experience, caramelize the sugar shortly before you plan to serve.
- Keep the Cake Level: If your cake domes during baking, once it’s completely cooled, carefully trim the top with a serrated knife to create a flat surface. This ensures the custard layer sits evenly and beautifully.
Nutrition Information
Below is an approximation of the nutritional content per serving. Please note that these values can vary based on ingredients and preparation methods.
- Calories: 537 kcal
- Carbohydrates: 73 g
- Protein: 11 g
- Fat: 23 g
- Saturated Fat: 12 g
- Polyunsaturated Fat: 2 g
- Monounsaturated Fat: 7 g
- Trans Fat: 1 g
- Cholesterol: 253 mg
- Sodium: 282 mg
- Potassium: 212 mg
- Fiber: 1 g
- Sugar: 47 g
- Vitamin A: 866 IU
- Vitamin C: 0.1 mg
- Calcium: 194 mg
- Iron: 2 mg
Nutrition information is automatically calculated and should be used as an approximation only.
Did you love this recipe? Leave a comment and a rating below!