
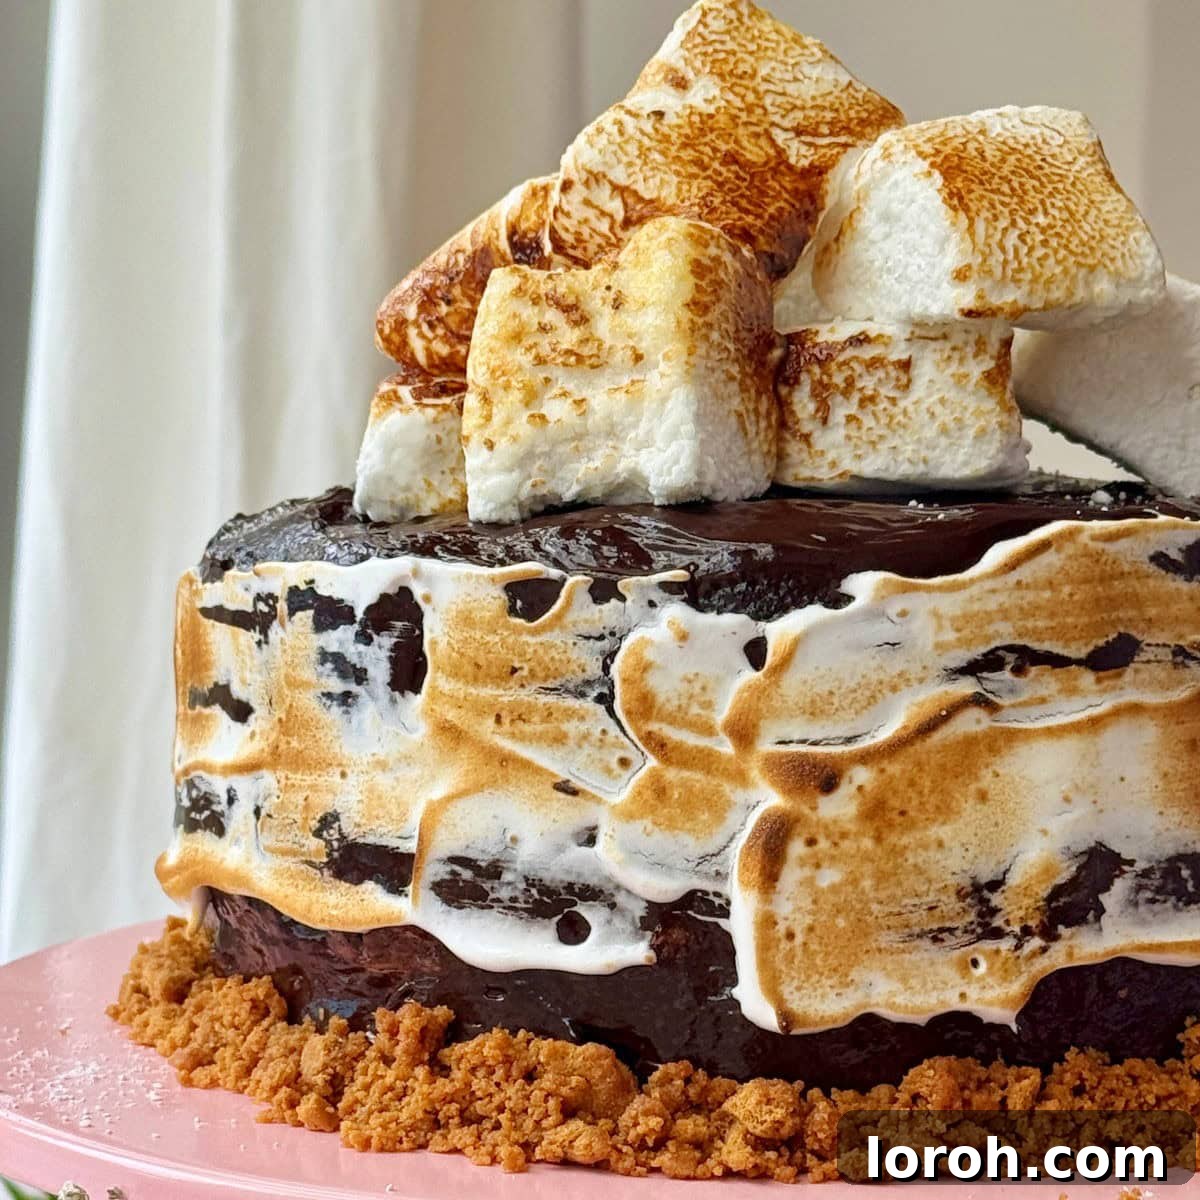
Transform your favorite campfire treat into a truly showstopping **s’mores cake**. This indulgent dessert masterfully combines layers of deep, rich chocolate sponge with cloud-like toasted marshmallow frosting and a satisfying crunch from biscuit crumbs, delivering a nostalgic and profoundly chocolatey delight. It’s an experience in every bite – dark, decadent, and the quintessential celebration cake. While store-bought marshmallows are certainly delicious, crafting your own homemade marshmallows elevates this s’mores cake to an unparalleled level of gourmet goodness. This comprehensive guide will equip you with a convenient make-ahead schedule, essential troubleshooting tips, and smart storage advice, ensuring your baking adventure results in nothing less than perfection.
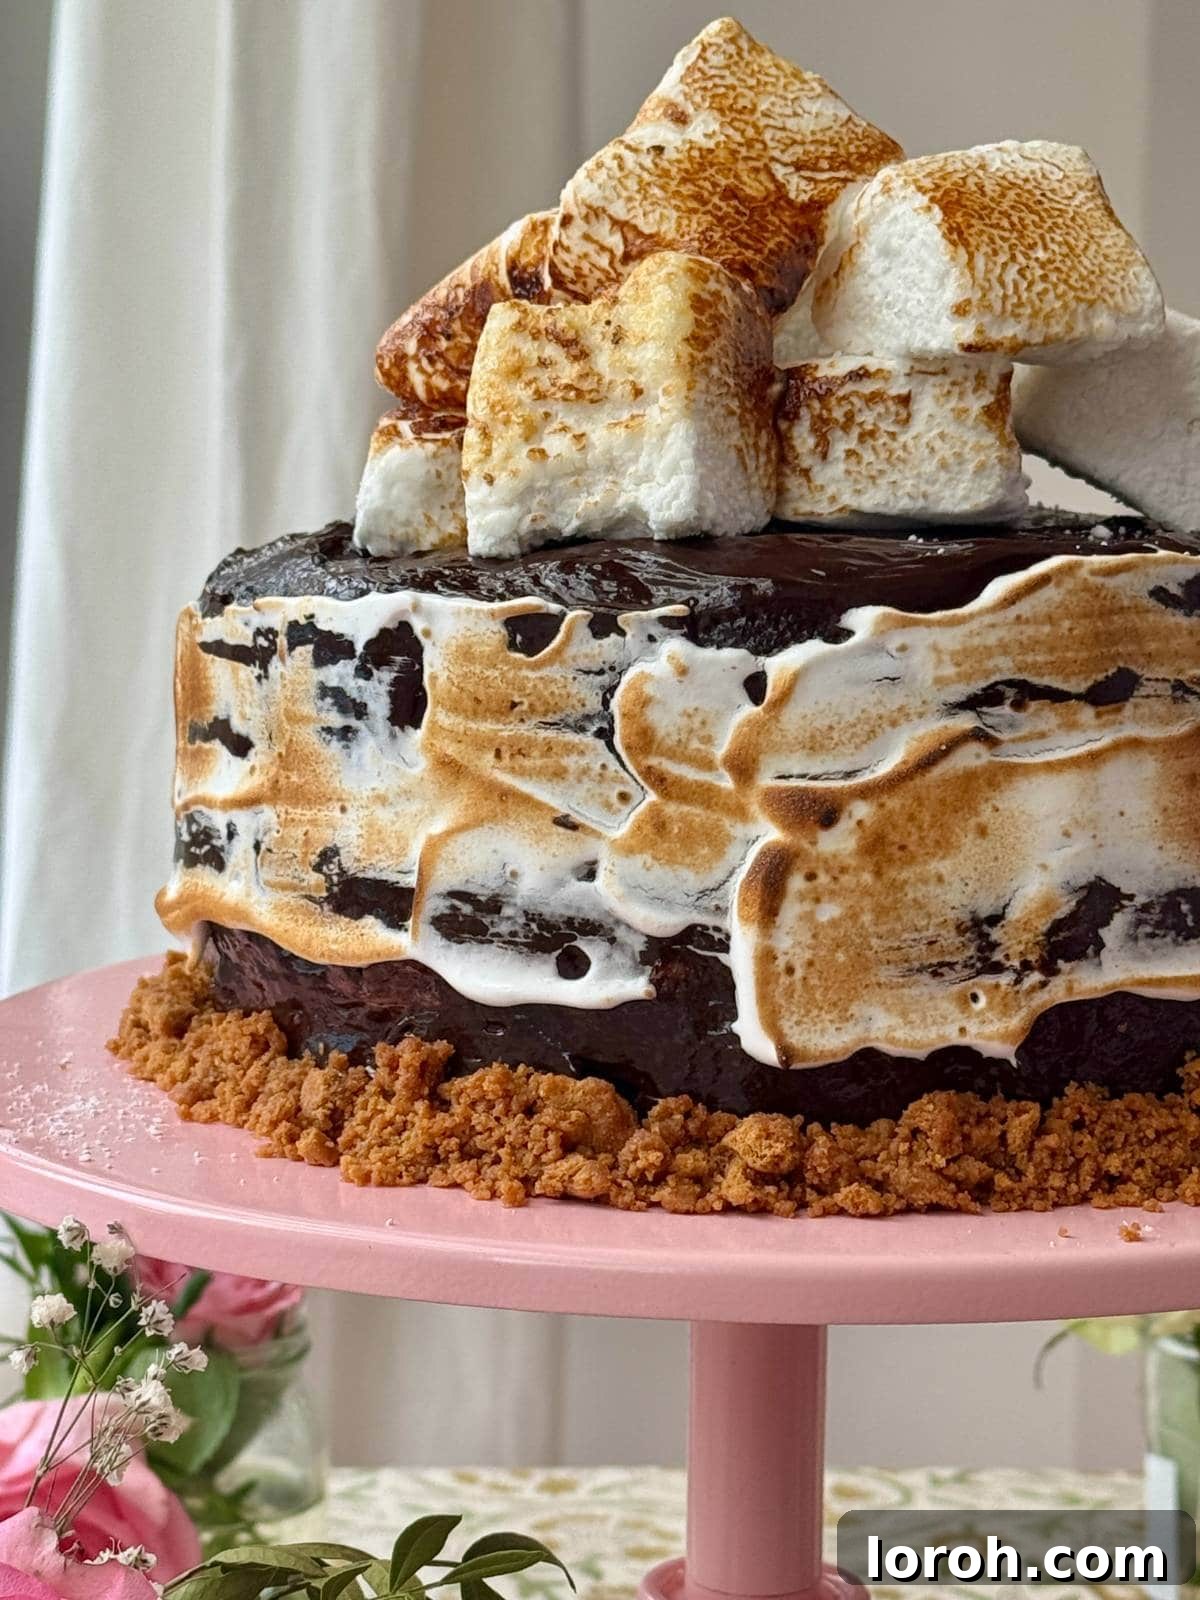
The magic of a s’mores cake lies in its harmonious blend of textures and flavors. Imagine biting into a moist, intensely chocolatey cake, followed by the ethereal sweetness of perfectly toasted marshmallow, and finishing with the satisfying snap of a buttery biscuit crust. This recipe isn’t just about combining ingredients; it’s about recreating that beloved campfire experience in an elegant, impressive dessert format. Whether you’re a seasoned baker or new to the kitchen, our step-by-step instructions will guide you through creating a masterpiece that will wow your guests and satisfy every sweet craving. We’ll dive deep into each component, offering expert advice to ensure your cake is moist, your ganache is glossy, and your marshmallow frosting is flawlessly fluffy.
Table of Contents
- Why You Will Love This Ultimate S’mores Cake Recipe
- Key Ingredients for the Perfect S’mores Cake
- Substitutions and Variations to Customize Your Cake
- Step-by-Step: How to Make the Best S’mores Cake
- Expert Baking and Assembly Tips
- Frequently Asked Questions About S’mores Cake
- Other Decadent Chocolate Recipes You Might Enjoy
- The Best S’mores Cake Recipe Card
Why You Will Love This Ultimate S’mores Cake Recipe
- Irresistible Layers of Flavor: Each bite delivers the quintessential s’mores experience with a sophisticated twist. The deep cocoa notes of the chocolate sponge perfectly complement the airy, sweet toasted marshmallow frosting and the delightful crunch of the biscuit layers, creating a truly harmonious flavor profile. It’s a symphony of sweet, rich, and textural sensations that will captivate your taste buds.
- Effortlessly Impressive & Make-Ahead Friendly: While this s’mores cake looks incredibly elaborate and challenging, it’s surprisingly accessible for bakers of all levels. Our detailed instructions break down each component, making the process enjoyable. What’s more, many elements can be prepared in advance over a few days, allowing for stress-free assembly when it’s time to showcase your culinary artistry. This flexibility makes it ideal for busy schedules without compromising on quality or presentation.
- Versatile for Any Occasion: This magnificent s’mores cake isn’t just for campfires; it’s a showstopper perfect for a wide range of celebrations. It makes an unforgettable birthday cake, a delightful centerpiece for summer BBQs, or a comforting, luxurious dessert for cozy winter gatherings. Its universal appeal ensures it will be a hit, no matter the event or season.
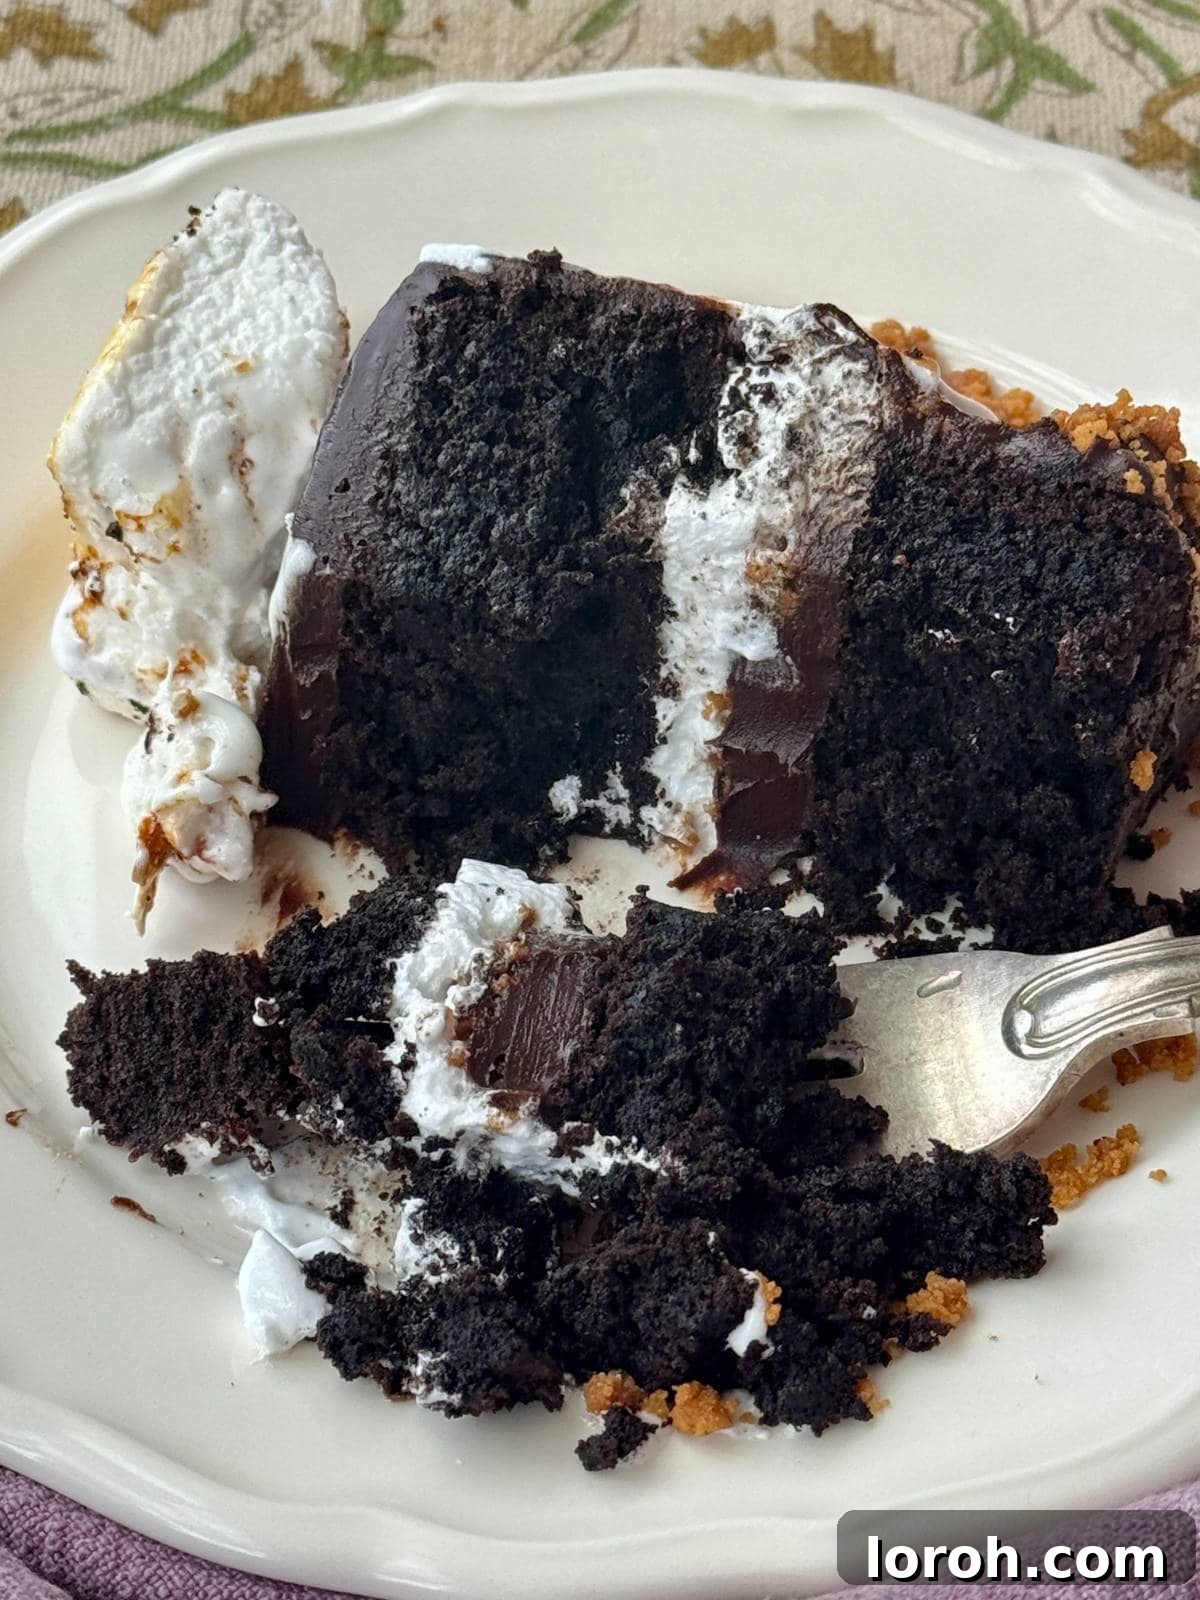
Key Ingredients for the Perfect S’mores Cake
The full, detailed recipe with exact measurements can be found in the printable recipe card at the bottom of this post. Simply scroll down to access it!
For the Rich Chocolate Sponge:
Unsweetened Dark Cocoa Powder: This is the secret to achieving that deep, sophisticated color and intensely rich chocolate flavor in your s’mores cake sponge. While any good-quality Dutch-process or natural cocoa powder will work, opting for a dark variety truly elevates the depth of the chocolate. The higher cocoa content ensures a less sweet, more complex base for our decadent cake.
Vegetable Oil: Don’t skip this! Alongside the butter, vegetable oil plays a crucial role in ensuring the cake crumb remains incredibly moist, tender, and light. It contributes to a softer texture that butter alone cannot achieve, making your chocolate s’mores cake melt-in-your-mouth delicious.
Coffee: While you won’t taste coffee in the final product, it’s a magical ingredient that significantly enhances the chocolate flavor. Instant coffee granules dissolved in boiling water work perfectly here, intensifying the cocoa notes and adding complexity without overpowering the cake. Think of it as chocolate’s best friend!
Self-Raising Flour: Known as self-rising flour in the US, this convenient ingredient already contains baking powder and salt, simplifying your baking process. It helps achieve a beautifully risen and tender sponge. If you can’t find it, a simple substitution is provided in the variations section below.
Other Essentials: Don’t forget good quality dark chocolate for melting into the sponge, unsalted butter for flavor and texture, caster sugar for sweetness and structure, and large eggs to bind everything together and add richness.
For the Velvety Chocolate Ganache:
Double Cream: Also known as heavy cream in some regions, this is fundamental for creating a luxuriously smooth and rich ganache. The high-fat content ensures a stable emulsion with the chocolate, resulting in a thick, glossy, and utterly decadent frosting. Ensure it’s full-fat for the best results.
Dark Chocolate: For the ganache, a high-quality dark chocolate (50-70% cocoa solids) is paramount. This balances the sweetness of the marshmallow and biscuit layers, preventing the cake from becoming overly cloying. Choose a brand you love for eating, as its flavor will shine through.
For the Fluffy Marshmallow Frosting:
Egg Whites: These are the star of your homemade marshmallow frosting. When whipped to stiff peaks with sugar, they create a stable, airy, and incredibly voluminous meringue that mimics the texture and taste of real marshmallows. Using a kitchen scale to measure egg whites by weight (160g, approximately 4 large eggs) ensures precision and perfect results.
Caster Sugar: Fine granulated sugar is ideal for marshmallow frosting as it dissolves easily in the egg whites over a bain-marie, ensuring a smooth, non-gritty meringue. Its quick solubility is key to achieving that signature fluffy texture.
For the Crunchy Biscuit Crumb:
Lotus Biscuits: While traditional s’mores call for Graham crackers, Lotus Biscoff biscuits bring a unique, caramelized, and slightly spicy flavor that beautifully complements the chocolate and marshmallow. Their distinct taste adds an extra layer of gourmet appeal. However, feel free to use your preferred biscuit or cookie for the classic s’mores experience!
Butter: Melted butter binds the biscuit crumbs together, creating a stable, flavorful, and wonderfully crunchy crust layer that holds its shape and adds richness to the cake.
Substitutions and Variations to Customize Your Cake
This s’mores cake recipe is incredibly versatile, allowing for several substitutions and creative variations to suit your taste, dietary needs, or what you have on hand. Don’t be afraid to experiment!
Ingredient Swaps:
- Vegetable Oil: Any neutral-flavored oil will work perfectly in place of vegetable oil. Sunflower oil, canola oil, or even a light olive oil (ensure it’s not too strong in flavor) are excellent alternatives. The goal is to provide moisture without imparting a strong taste.
- Self-Raising Flour: If self-raising flour (or self-rising flour in the US) isn’t readily available, you can easily create your own. For every 1 cup (125g) of all-purpose (plain) flour, whisk in 1 ½ teaspoons of baking powder and ¼ teaspoon of fine salt. For this recipe’s 225g of self-raising flour, you would use 225g all-purpose flour with approximately 2 and ¼ teaspoons of baking powder and a generous pinch of salt.
- Lotus Biscuits: While I adore the caramelised notes of Lotus Biscoff, the beauty of a s’mores cake is its nod to tradition. Classic Graham crackers or digestive biscuits are fantastic, more traditional choices for the biscuit crumb. You could also try shortbread, chocolate wafers, or even crushed Oreos for a different twist. Choose your favorite biscuit (cookie) to make the crust uniquely yours.
- Dark Chocolate for Ganache: While a 50-70% dark chocolate is recommended for balance, you can adjust this to your preference. If you prefer a sweeter ganache, use a slightly lower percentage dark chocolate (e.g., 40-50%). Avoid milk chocolate, as it tends to make the cake overly sweet and can be harder to achieve a stable ganache.
- Coffee: If you’re sensitive to caffeine or simply prefer not to use coffee, you can substitute the instant coffee granules and boiling water with hot milk (dairy or non-dairy) or even hot chocolate. The goal is to add liquid and deepen the chocolate flavor, so a warm liquid with a neutral or complementary flavor profile works well.
Flavor & Topping Variations:
- Spiced S’mores Cake: Add a pinch of cinnamon or a tiny dash of chili powder to your chocolate sponge batter to introduce a warm, intriguing spice note that pairs beautifully with chocolate.
- Nutty Crunch: Incorporate finely chopped roasted nuts (like pecans or almonds) into your biscuit crumb layer for an extra layer of flavor and texture.
- Caramel Drizzle: A luscious salted caramel drizzle between the layers or over the finished cake can add another dimension of sweetness and sophistication.
- Chocolate Shavings: Before toasting the marshmallows, sprinkle some chocolate shavings or mini chocolate chips over the ganache for an extra chocolatey flourish.
- Different Marshmallow Flavors: While outside the scope of this recipe, if you’re making homemade marshmallows, consider infusing them with vanilla bean, peppermint extract, or even a touch of orange zest for a gourmet twist.
Step-by-Step: How to Make the Best S’mores Cake
This is a simplified step-by-step guide to help you visualize the process. For detailed instructions, precise measurements, and critical timings, please refer to the full recipe card at the bottom of the page.
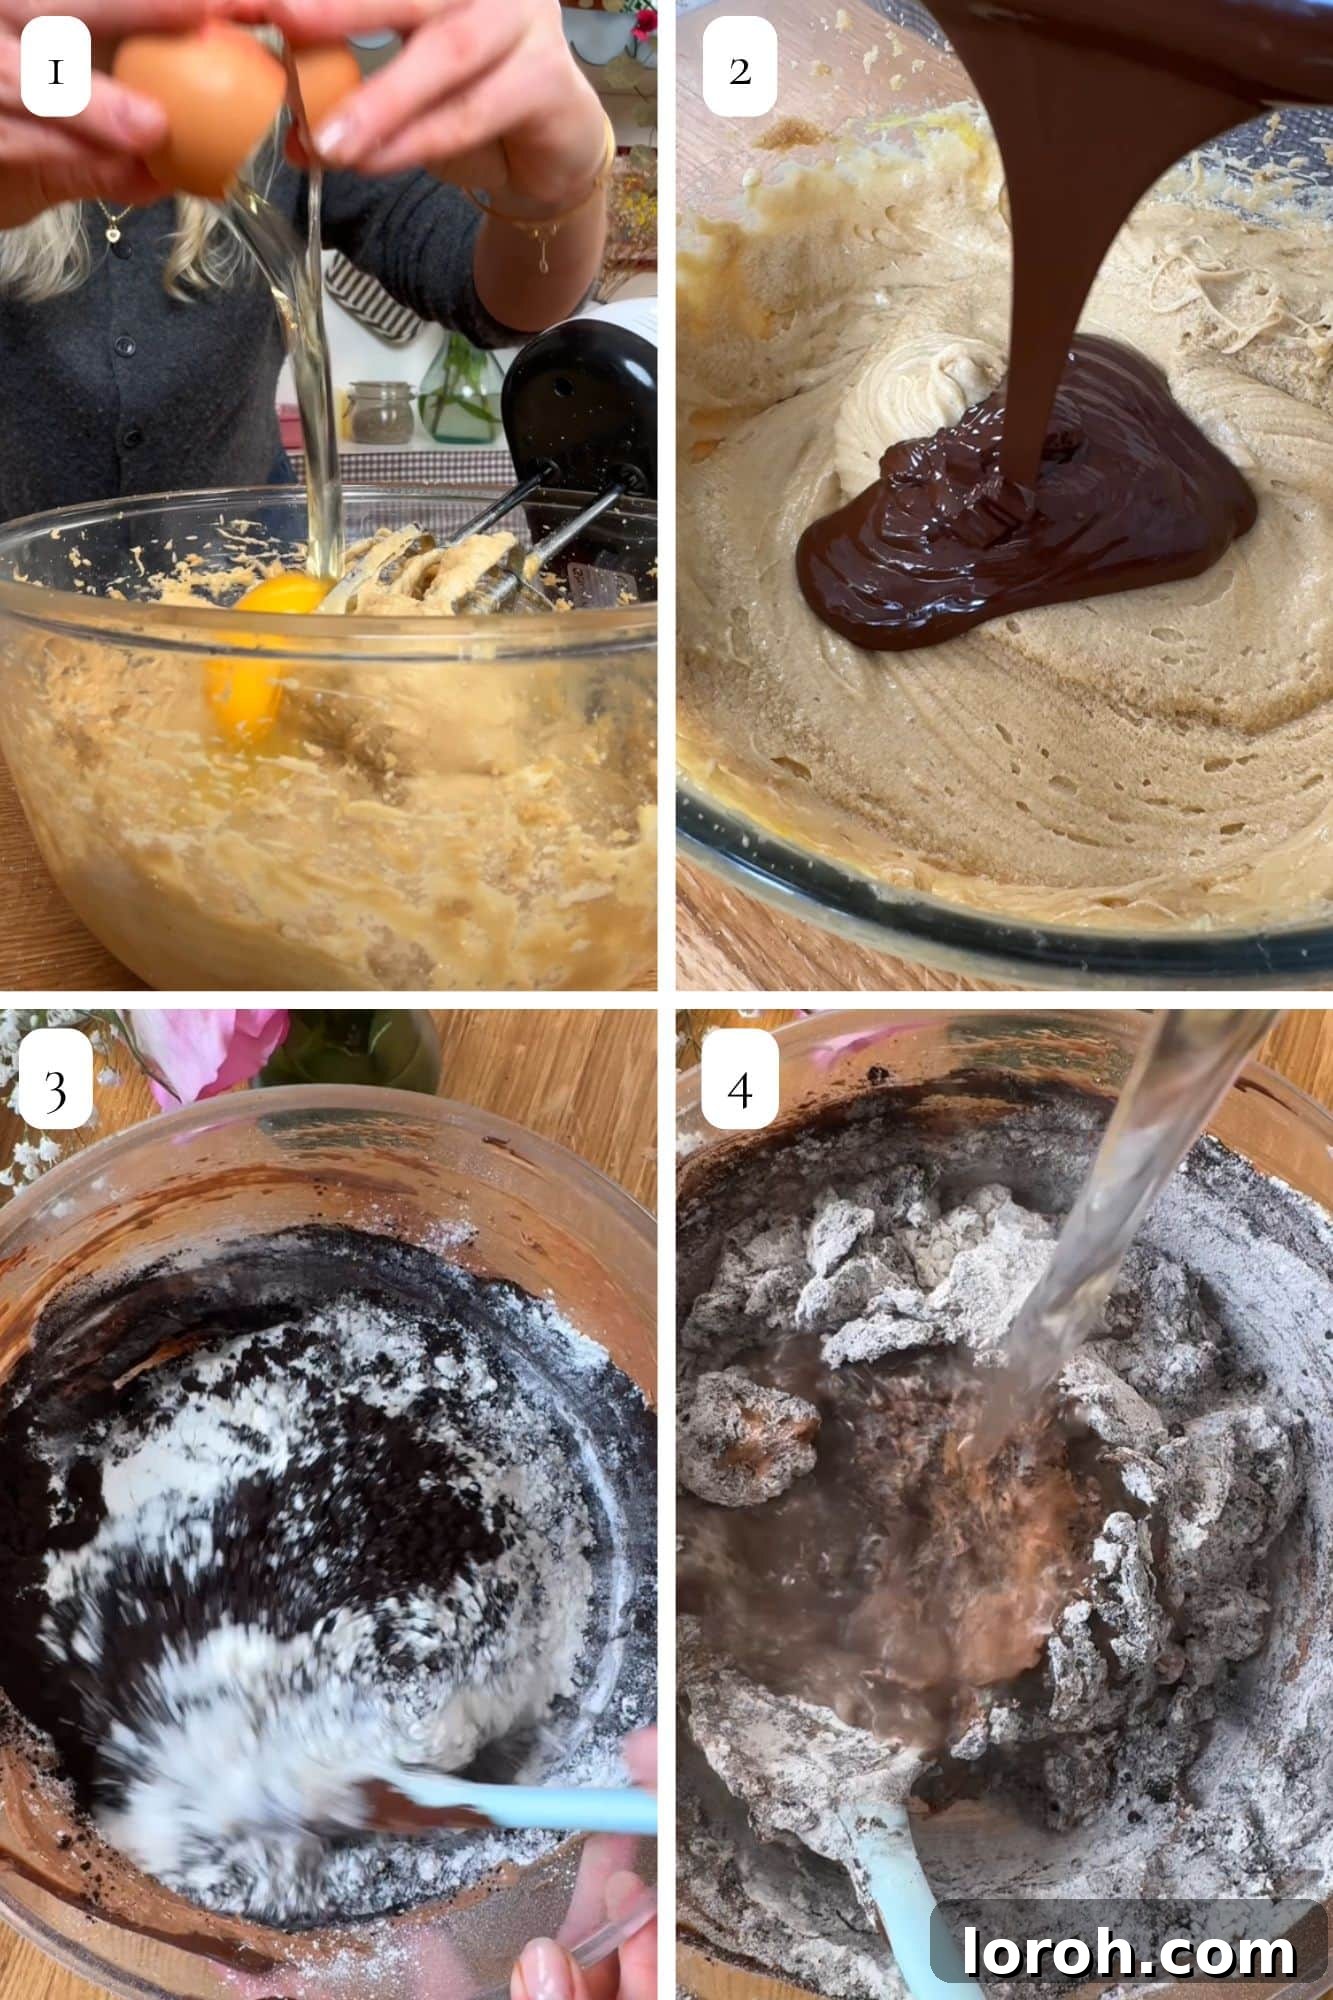
ONE: Prepare Your Oven and Pans. Start by preheating your oven to 170°C fan (190°C conventional / 375°F). This ensures a stable temperature for even baking. Carefully line the bottoms of three 18cm (7-inch) cake tins with parchment paper. This preparation prevents sticking and makes for easy removal of your delicate cake layers. Next, melt the 200g of dark chocolate over a gentle Bain Marie (a bowl set over simmering water), stirring until smooth and glossy. Remove it from the heat and set it aside to cool slightly. In the bowl of a stand mixer fitted with the paddle attachment, beat the softened unsalted butter and caster sugar together for a full 2 minutes until the mixture is light, creamy, and visibly pale. This creaming process incorporates air, giving your cake a lovely texture. Add the large eggs one at a time, beating well after each addition until fully incorporated before adding the next. This prevents the batter from curdling. Finally, gradually drizzle in the vegetable oil while the mixer is running on low speed; the oil contributes significantly to the sponge’s moistness.
TWO: Incorporate Melted Chocolate. Once the wet ingredients are beautifully combined, gently pour the slightly cooled melted chocolate into the stand mixer bowl. Mix briefly on low speed, just until the chocolate is integrated into the batter. Be careful not to overmix at this stage.
THREE: Add Dry Ingredients. Sift the self-raising flour, unsweetened dark cocoa powder, and a generous pinch of salt directly into the batter. Sifting helps prevent lumps and ensures a smooth, even texture. Mix on low speed until the dry ingredients are just combined and no streaks of flour remain. Overmixing here can lead to a tough cake.
FOUR: Introduce the Coffee Liquid. In a separate jug, mix 350ml of boiling water with the 10g of instant coffee granules until completely dissolved. This coffee mixture is vital for deepening the chocolate flavor. With the mixer running on low, slowly pour this hot coffee liquid into the cake batter. The batter will appear quite thin at this point, which is perfectly normal for this recipe – it’s designed to be a very moist and rich cake.
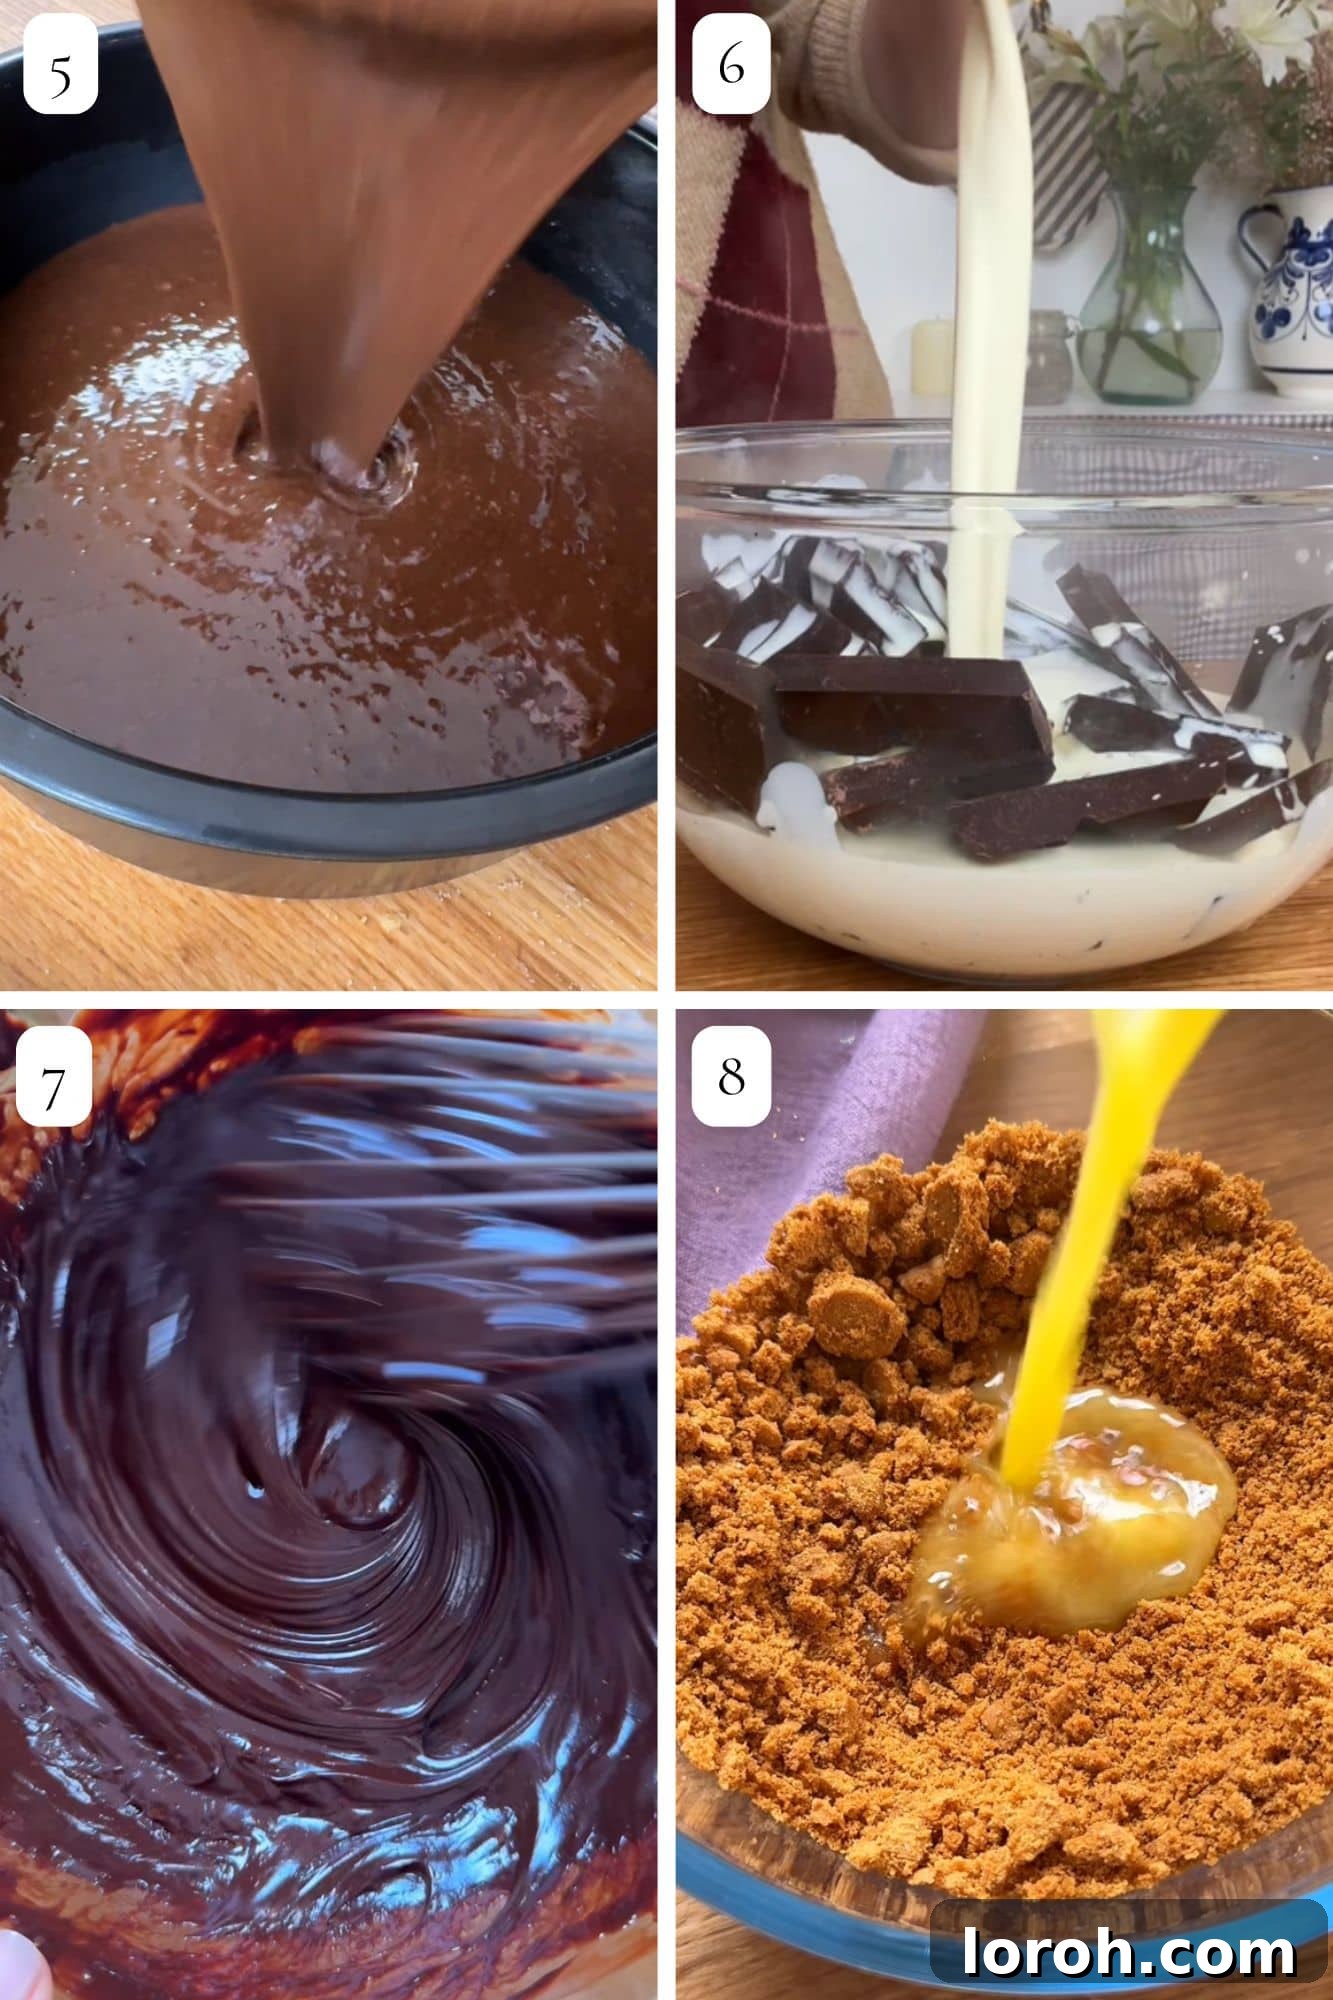
FIVE: Bake the Cake Layers. Divide the thin batter evenly among your three prepared cake tins. Place them in the preheated oven and bake for approximately 25-30 minutes. To test for doneness, insert a wooden skewer or toothpick into the center of a cake. If it comes out clean, the cakes are ready. If there’s still wet batter, bake for a few more minutes. Once baked, let them cool in their tins for 10-15 minutes before carefully inverting them onto a wire rack to cool completely. Cooling completely is crucial before frosting to prevent melting.
SIX: Prepare the Ganache Base. While your cakes are baking, start on the luxurious chocolate ganache. Begin by finely chopping the 600g of dark chocolate. The finer the chop, the faster and more evenly it will melt. In a small saucepan, gently heat the 300ml of double cream over medium heat. Keep a very close eye on it, stirring occasionally, as cream can boil over quickly and burn. You’re looking for it to just reach a gentle simmer, with small bubbles forming around the edges, but not a rolling boil.
SEVEN: Create the Silky Ganache. Transfer your finely chopped chocolate to a large, heatproof bowl. Once the cream is simmering, immediately pour the hot cream over the chopped chocolate. Add a pinch of salt to enhance the chocolate’s flavor. Let the mixture sit undisturbed for about 1 minute. This allows the heat from the cream to begin melting the chocolate. After a minute, using a whisk, slowly start mixing from the center outwards until all the chocolate is melted and the ganache becomes beautifully smooth, glossy, and emulsified. If there are any stubborn lumps, you can gently place the bowl over a Bain Marie for a moment while whisking, being careful not to overheat it. Set aside to cool to a spreadable consistency, or refrigerate briefly if you need it to firm up faster (but stir frequently to prevent hardening unevenly).
EIGHT: Prepare the Biscuit Crumb. For the delightful crunchy layer, take your 120g of Lotus biscuits and blitz them in a food processor until they form fine, even crumbs. If you don’t have a food processor, place the biscuits in a sealed sandwich bag and bash them with a rolling pin until finely crushed. Transfer the biscuit crumbs to a bowl and mix in the 40g of melted butter until well combined. This butter will help the crumbs hold together on the cake.
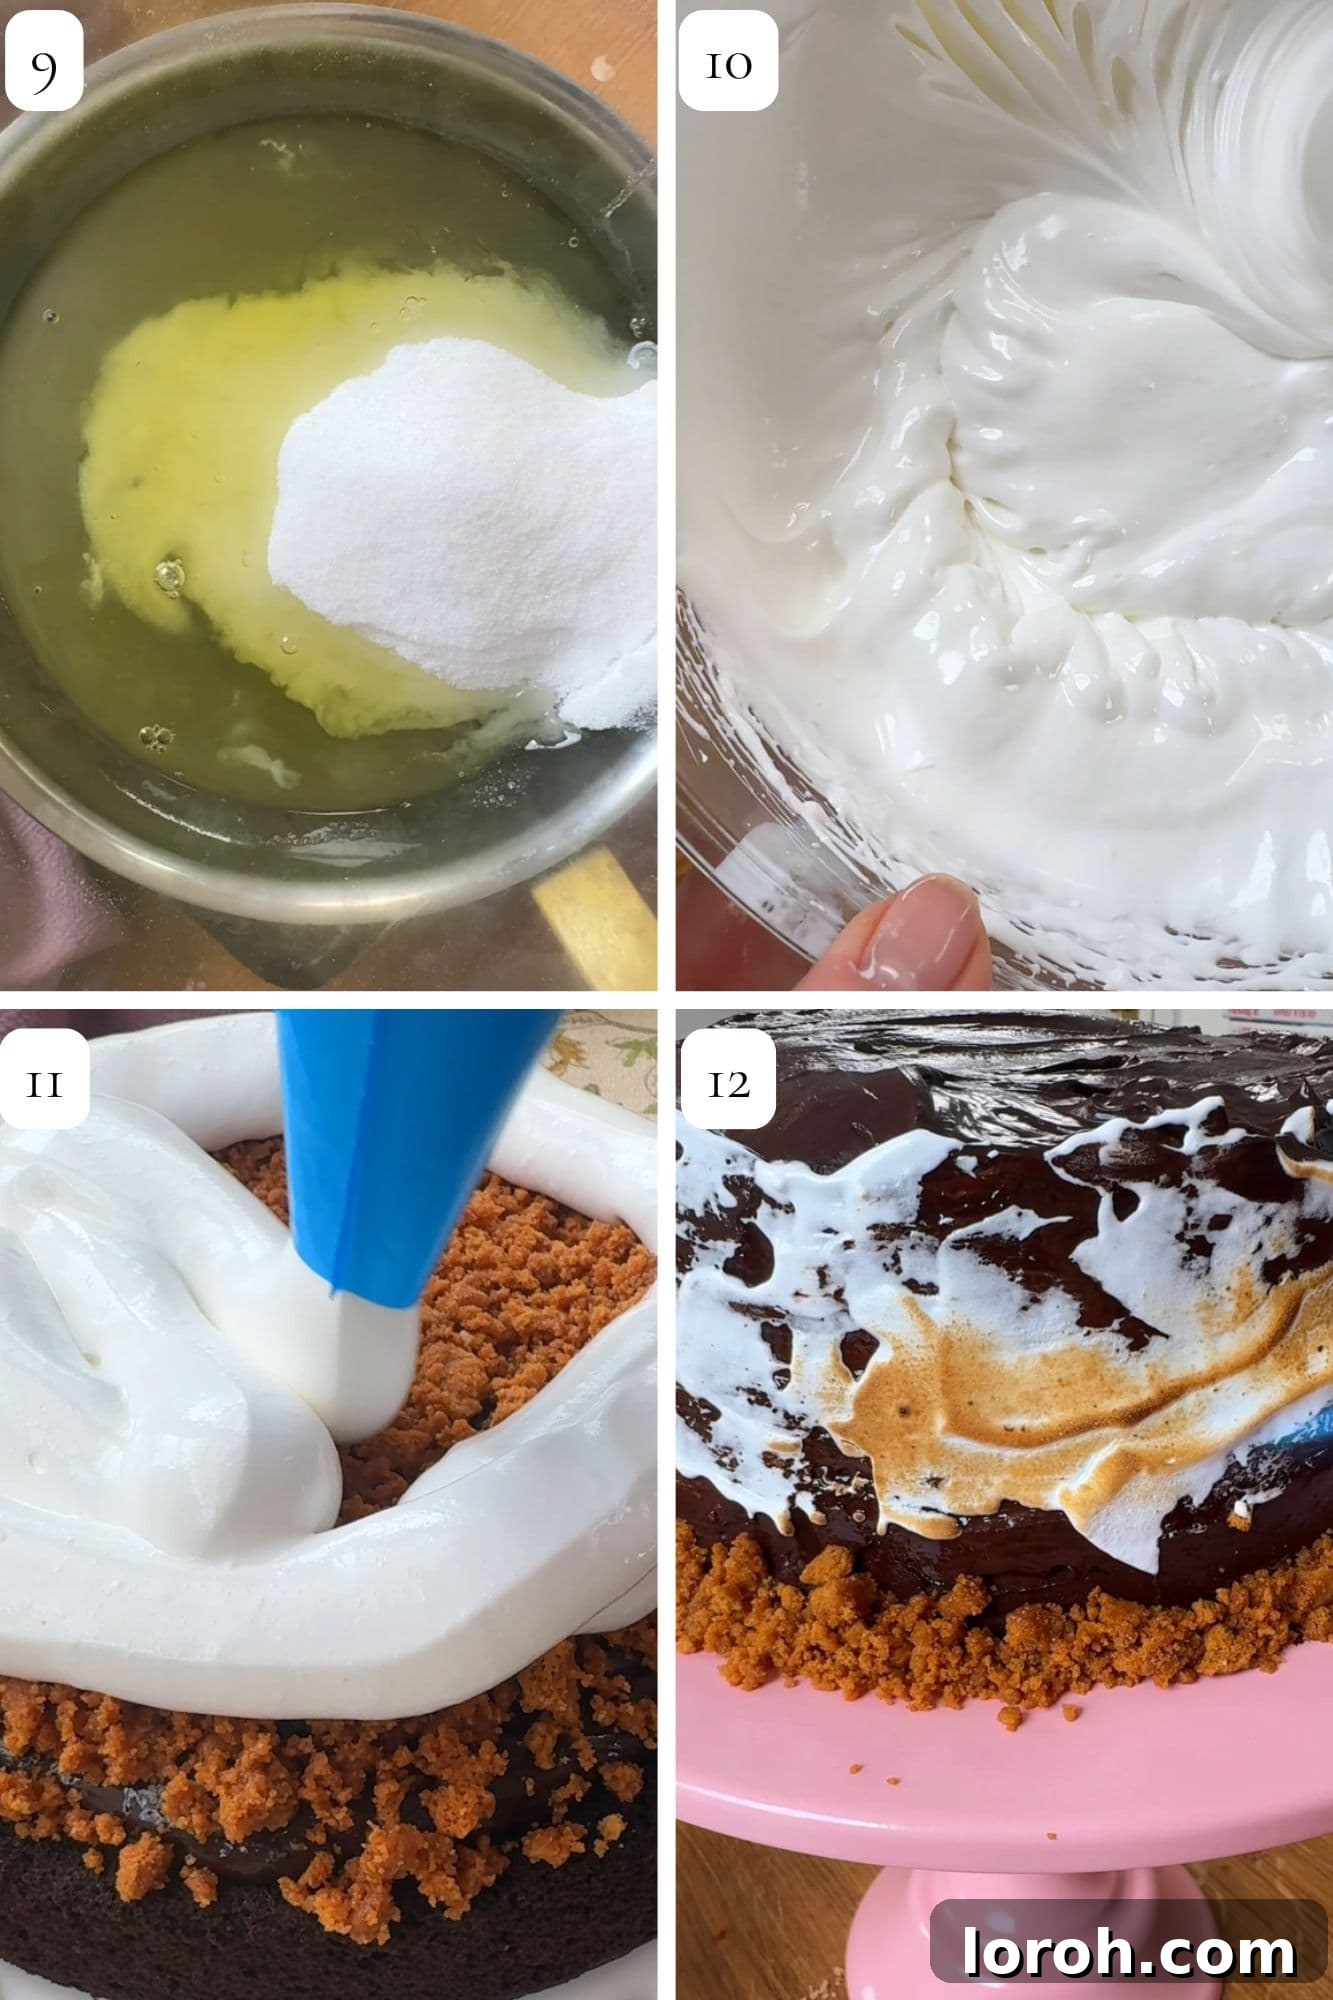
NINE: Make the Marshmallow Frosting Base (Swiss Meringue Method). For the incredibly fluffy marshmallow frosting, combine the 300g of caster sugar and 160g of egg whites (from approximately 4 large eggs) in a large heatproof bowl. Place this bowl over a saucepan of barely simmering water, ensuring the bottom of the bowl does not touch the water. With a manual whisk, continuously whisk the mixture until all the sugar is completely dissolved. To test this, rub a small amount of the mixture between your thumb and forefinger – it should feel absolutely smooth, with no gritty sugar crystals. The mixture should be gently warm, not hot. This process pasteurizes the egg whites and dissolves the sugar simultaneously.
TEN: Whisk to Stiff Meringue. Once the sugar is fully dissolved, carefully remove the bowl from the heat and transfer the mixture to the bowl of a stand mixer. Using the whisk attachment, begin whisking on medium-high speed. Continue whisking for about 10 minutes (it can take up to 15 minutes, depending on your mixer), until the meringue is incredibly thick, glossy, and forms very stiff peaks that hold their shape firmly. If you don’t have a stand mixer, a powerful handheld electric whisk will also work, though it may take a little longer. This is the magical transformation into light and airy marshmallow frosting!
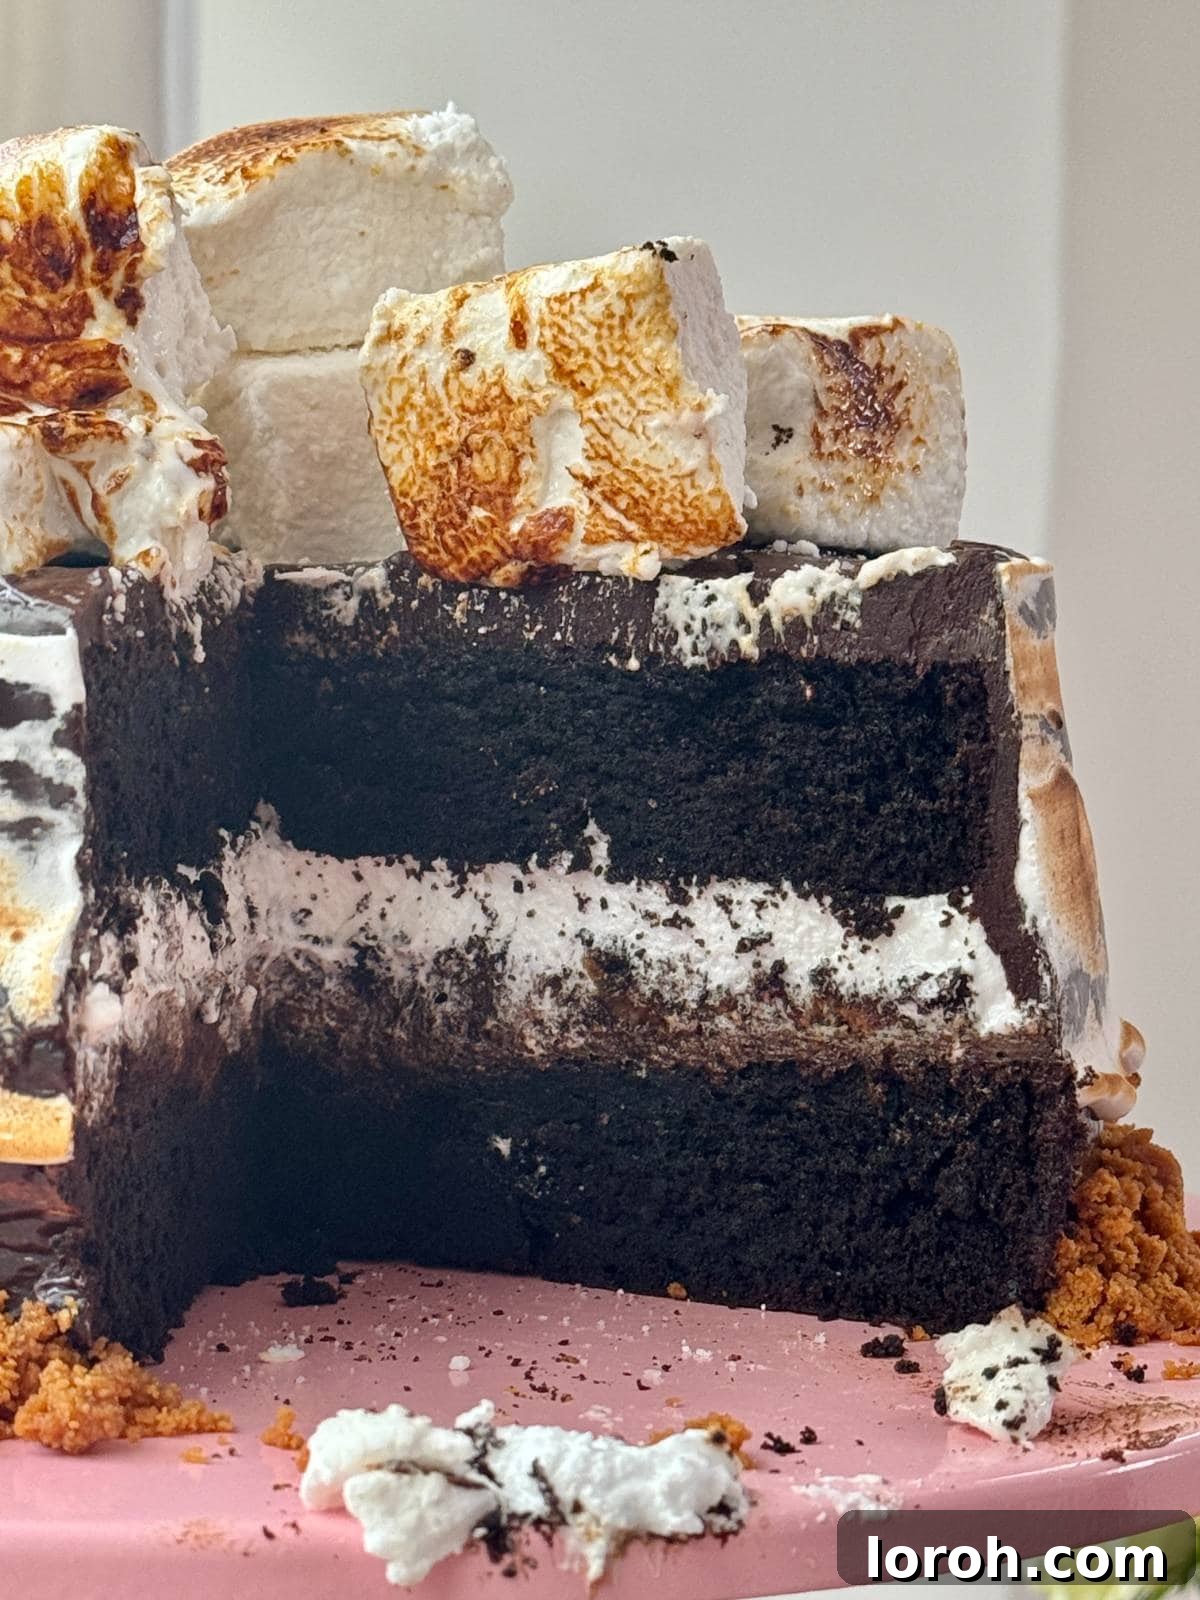
ELEVEN: Begin Assembling the Cake. Once all your components are cooled and ready, it’s time for assembly. Place your first cooled chocolate sponge layer onto your chosen serving plate or cake stand. Spread a generous, thick layer of your cooled chocolate ganache over the top of the sponge, smoothing it out evenly with an offset spatula. Next, sprinkle a good portion of the biscuit crumbs over the ganache. Finally, pipe or carefully spread a layer of the fluffy marshmallow frosting over the biscuit crumbs. Gently place the second chocolate sponge layer on top of this marshmallow layer, pressing down lightly.
TWELVE: Final Layers and Toasting. Repeat step eleven with the second sponge layer: spread ganache, sprinkle biscuit crumbs, and add marshmallow frosting. Place the third and final chocolate sponge layer on top. Now, use the remaining ganache to cover the entire cake – top and sides – smoothing it out as best you can with a palette knife or spatula for a professional finish. Next, take small patches of your leftover marshmallow frosting and artfully swipe them onto the sides and top of the cake, creating a rustic, toasted effect later. Sprinkle any remaining biscuit crumbs around the base of the cake for extra texture and visual appeal. Finally, crown your magnificent creation with marshmallows (homemade or shop-bought work equally well). For that authentic s’mores look, use a kitchen blowtorch to lightly brown and toast the marshmallow frosting and the marshmallows on top until they’re golden and slightly charred. This step truly brings the campfire magic to life!
Expert Baking and Assembly Tips
Make-Ahead Schedule for Stress-Free Baking
Preparing this decadent s’mores cake can be spread across a few days, making the process much more manageable and enjoyable. Here’s a recommended schedule:
Day 1: Bake & Chill
- Bake Cake Layers: Prepare and bake your chocolate sponge layers. Allow them to cool completely on a wire rack.
- Wrap & Store Cakes: Once fully cooled, wrap each cake layer tightly in baking parchment, then again in cling film (plastic wrap). This prevents them from drying out. Store them at room temperature for up to 2 days, or freeze them for up to 3 months.
- Make Ganache: Prepare the chocolate ganache. Once it has cooled to room temperature, cover it tightly and refrigerate. It will firm up considerably.
Day 2: Final Preparations & Assembly
- Prepare Biscuit Crumbs: Crush the biscuits and mix with melted butter. Store in an airtight container at room temperature.
- Soften Ganache: Remove the ganache from the fridge at least 1-2 hours before assembly to allow it to soften to a spreadable consistency. You may need to gently whisk it to restore its smooth texture.
- Prepare Marshmallow Frosting: Make the marshmallow frosting (Swiss meringue) fresh on assembly day for the best airiness and texture.
- Assemble Your Masterpiece: Follow the assembly instructions to stack and decorate your s’mores cake.
Troubleshooting Common Problems
Even experienced bakers encounter challenges. Here are solutions to common s’mores cake dilemmas:
My marshmallow frosting is runny and won’t hold its shape.
- Ensure Sugar Dissolution: The most crucial step for stable meringue is making sure *all* the sugar crystals are fully dissolved in the egg whites over the Bain Marie. If you can feel any grit when rubbing the mixture between your fingers, continue heating and whisking until it’s completely smooth. Undissolved sugar will prevent your meringue from stiffening.
- Whisk to Stiff Peaks: You must whisk the meringue for long enough until it reaches stiff peaks. When you lift the whisk, the meringue should stand firm and not droop. If it’s still soft, keep whisking!
- Temperature Matters: If your kitchen is particularly warm, the frosting might soften. After whisking, you can chill the frosting briefly in the refrigerator (for about 15-20 minutes) before assembling, but be careful not to let it harden too much.
- Clean Bowl & Whisk: Ensure your mixing bowl and whisk are impeccably clean and free of any grease or fat. Even a tiny trace can prevent egg whites from whipping properly.
My ganache won’t thicken properly.
- Chill, Chill, Chill: Ganache needs time and cold to firm up. Place it in the fridge, stirring it every 15-20 minutes to ensure it chills evenly. The longer it’s in the fridge, the firmer it will become. If it gets too hard, let it sit at room temperature for a while, or gently warm it over a Bain Marie for a few seconds (stirring constantly) until it’s spreadable.
- Ratio Check: Double-check your chocolate to cream ratio. Too much cream or not enough chocolate will result in a runnier ganache. Ensure you’re using high-quality dark chocolate, as chocolate with a lower cocoa percentage (like milk chocolate) has less cocoa butter, which contributes to firmness.
- Overheating: If the cream or chocolate was overheated, it could affect the ganache’s ability to set properly. Ensure the cream only simmers gently, and don’t let the chocolate burn when pouring the hot cream over it.
Frequently Asked Questions About S’mores Cake
Absolutely! The unfrosted chocolate sponge layers freeze exceptionally well. For best results, wrap each cooled layer individually in baking parchment, then securely in cling film (plastic wrap), and freeze them for up to 3 months. When you’re ready to assemble, simply defrost the layers overnight at room temperature. While the ganache is best made fresh for optimal results, it can be prepared a few days in advance and stored in the fridge. Just ensure you bring it back to room temperature and give it a good stir before attempting to spread it, as it will firm up considerably in the cold.
You certainly can use shop-bought marshmallow fluff in a pinch for this s’mores cake, and it will still be delicious! However, it’s typically much thicker and denser than homemade Swiss meringue marshmallow frosting. This means it won’t spread quite as smoothly or have the same airy, light texture. If you opt for fluff, you might find it easier to pipe rather than spread, and it will contribute to a slightly different mouthfeel, but the s’mores flavor profile will definitely be there.
For the most balanced and delicious s’mores cake, we highly recommend using a high-quality dark chocolate with 50–70% cocoa solids for your ganache. This range provides a rich, deep chocolate flavor that perfectly cuts through the sweetness of the marshmallow and biscuit layers, preventing the cake from becoming overly saccharine. Avoid using milk chocolate for the ganache, as its higher sugar content can make the entire cake too sweet and potentially sickly, detracting from the overall experience.
Yes, this recipe is wonderfully adaptable for cupcakes! To make s’mores cupcakes, simply divide the prepared chocolate cake batter evenly among 18 cupcake cases. Bake them for a shorter duration, typically 15-20 minutes, or until a skewer inserted into the center comes out clean. Once cooled, you can frost them by smoothing on the chocolate ganache, piping on a generous swirl of marshmallow frosting, and finishing with a sprinkle of biscuit crumbs. A quick toast with a blow torch will give them that signature s’mores look!
No blow torch? No problem! You can achieve that perfectly toasted marshmallow effect using your oven’s grill (broiler). Place the assembled cake on a baking sheet and position it under a very hot grill for a brief 20-30 seconds. It’s crucial to keep the oven door slightly ajar and watch the cake constantly and closely, as marshmallows can brown and burn very quickly. Any longer, and you risk melting the delicate chocolate ganache. The key is extreme heat for a very short duration to achieve that golden, toasted s’mores look without compromising the rest of your beautiful cake.
Other Decadent Chocolate Recipes You Might Enjoy:
If you absolutely adored creating and devouring this rich s’mores cake recipe, you’re in for a treat with some of my other favorite indulgent bakes! You will surely love my Matilda chocolate layer cake, a true classic, my vibrant chocolate orange cake, or my delightfully fresh pistachio & raspberry cake.
Easy Baking Recipes
Chocolate Mud Cake with Malted Whipped Cream
Easy Dessert Recipes
Tiramisu Tres Leches Cake
Easy Baking Recipes
Raspberry and Chocolate Cake
Easy Baking Recipes
Chocolate Fudge Cake
If you tried this glorious S’mores Cake or any other recipe on our site, we would absolutely love to hear from you! Please take a moment to leave a rating and a comment below to let us know how your baking adventure went and what you thought of this irresistible dessert!
The Best S’mores Cake
1 hour
30 minutes
1 hour 30 minutes
16 servings
Rate Recipe
Print Recipe
Ingredients
For the sponge:
- 200 g dark chocolate
- 150 g unsalted butter, softened
- 90 g vegetable oil
- 300 g caster sugar
- 3 large eggs
- 40 g unsweetened dark cocoa powder
- 225 g self-raising flour
- 350 ml boiling water
- 10 g instant coffee granules
For the ganache
- 600 g dark chocolate
- 300 ml double cream
- Pinch of salt
For the biscuit crumb:
- 120 g lotus biscuits
- 40 g butter
For the marshmallow frosting:
- 300 g caster sugar
- 160 g egg whites
To decorate
- Marshmallows, as many as you like
Instructions
For the biscuit crumb:
-
Blitz the lotus biscuits in a food processor (or bash in a sealed sandwich bag) until finely crushed. Transfer the crumbs to a bowl and mix in the melted butter until well combined. Set aside.
To make the cake:
-
Preheat your oven to 170°C fan/190°C conventional/375°F. Line the bottoms of 3 x 18cm (7-inch) cake tins with parchment paper.
-
Melt 200g dark chocolate over a Bain Marie, stirring until smooth. Remove from heat and set aside to cool slightly.
-
In a stand mixer, beat the softened unsalted butter and caster sugar together for 2 minutes until the mixture is light, creamy, and pale. Add the 3 large eggs one at a time, beating well after each addition until fully incorporated.
-
With the mixer on low speed, slowly drizzle in the 90g vegetable oil. Then, pour in the slightly cooled melted chocolate and mix briefly until just combined.
-
Sift the 225g self-raising flour, 40g unsweetened dark cocoa powder, and a pinch of salt into the bowl. Mix on low speed until the dry ingredients are just combined and no streaks of flour remain.
-
In a jug, mix 350ml boiling water with 10g instant coffee granules until dissolved. Gradually pour this hot coffee mixture into the cake batter, mixing until the batter is smooth. It will be quite thin – this is normal for a moist cake.
-
Divide the batter evenly among the three prepared cake tins. Bake for 25-30 minutes, or until a wooden skewer inserted into the center comes out clean. Let the cakes cool in their tins for 10-15 minutes, then invert onto a wire rack to cool completely.
To make the ganache:
-
Finely chop 600g dark chocolate and place it in a large, heatproof bowl. Gently heat 300ml double cream in a saucepan until it just reaches a simmer, with small bubbles forming around the edges (do not boil rapidly).
-
Pour the hot cream over the chopped chocolate. Add a pinch of salt. Let it sit for 1 minute to allow the chocolate to melt. Then, use a whisk to mix everything together, starting from the center and working outwards, until the ganache is smooth, glossy, and emulsified.
-
If there are any small, stubborn lumps of chocolate, you can gently heat the bowl over a Bain Marie while continuously whisking to help them melt. Set the ganache aside to cool to a spreadable consistency. If you need it to firm up faster, refrigerate it briefly, stirring every 15 minutes to prevent it from becoming too hard.
For the marshmallow frosting:
-
Combine 300g caster sugar and 160g egg whites in a large heatproof bowl. Place this bowl over a saucepan of barely simmering water, ensuring the bottom of the bowl does not touch the water.
-
Using a manual whisk, continuously whisk the mixture until all the sugar is dissolved. To check for this, rub a small amount of the mixture (it should be gently warm, not hot) between your forefinger and thumb – it should feel completely smooth with no grit. The mixture will still be very loose; you are not whipping it thick yet.
-
Once the sugar is dissolved, remove the bowl from the heat and transfer the mixture to the bowl of a stand mixer fitted with the whisk attachment. Whisk on medium-high speed for about 10 minutes (up to 15), until you achieve a thick, glossy, and stiff meringue that holds its shape. A handheld electric whisk can also be used.
-
For easier application, you can transfer the marshmallow frosting to a piping bag (or a sturdy sandwich bag with a corner snipped off). Otherwise, cover the bowl and set aside until ready to assemble.
To assemble the cake:
-
Place one cooled chocolate sponge layer onto your chosen serving plate or cake stand.
-
Spread a thick, even layer of the cooled chocolate ganache over the sponge. Sprinkle a generous amount of biscuit crumbs over the ganache. Then, pipe or carefully spread a layer of the fluffy marshmallow frosting on top of the biscuit crumbs. Gently place the second sponge layer on top.
-
Repeat the layering process for the second sponge, then top with the third and final sponge. Use the remaining ganache to cover the entire cake (top and sides), smoothing it with a palette knife or spatula. Artfully swipe small patches of marshmallow frosting onto the sides and top of the cake. Sprinkle any remaining biscuit crumbs around the base of the cake. Top the cake with whole marshmallows (homemade or shop-bought).
-
For that signature s’mores aesthetic, use a kitchen blowtorch to lightly brown and toast the marshmallow frosting and the marshmallows on top until they’re golden and slightly charred. This final touch brings all the campfire magic to your celebration cake!
Notes
To store: The assembled s’mores cake will keep beautifully in an airtight container at room temperature for up to 2 days. Alternatively, it can be stored in the refrigerator for up to 3 days. If refrigerated, remember to remove the cake from the fridge about 20 minutes before serving to allow it to lose its chill and for the flavors and textures to soften (unless it’s a very hot day, in which case keep it cool to prevent melting).
To freeze: The unfrosted chocolate sponge layers are excellent for freezing. Wrap each cooled layer individually in baking parchment, then tightly in cling film (plastic wrap), and freeze for up to 3 months. Defrost them overnight at room temperature before proceeding with frosting. While the ganache is best made fresh for optimal results, it can be made a few days in advance and kept in the fridge. Just be sure to bring it to room temperature and stir well before attempting to spread it.
Make ahead: The chocolate sponge layers can be baked 1–2 days in advance. Once fully cooled, wrap them tightly in baking parchment and then in cling film, storing them at room temperature until you’re ready to assemble.
The ganache can also be prepared in advance. Store it in the fridge for up to 48 hours. Before use, allow it to come back to room temperature and then whisk or stir it to restore its smooth, spreadable consistency. The biscuit crumbs can also be made 3 days ahead and stored in the fridge in an airtight container.
For the best results and optimum airiness, make the marshmallow frosting (Swiss meringue) on the day you plan to assemble and serve the cake.
Nutrition
Carbohydrates: 78g,
Protein: 9g,
Fat: 47g,
Saturated Fat: 25g,
Polyunsaturated Fat: 5g,
Monounsaturated Fat: 13g,
Trans Fat: 0.4g,
Cholesterol: 79mg,
Sodium: 88mg,
Potassium: 487mg,
Fiber: 7g,
Sugar: 52g,
Vitamin A: 645IU,
Vitamin C: 0.1mg,
Calcium: 65mg,
Iron: 7mg
Nutrition information is automatically calculated, so should only be used as an approximation.
Like this? Leave a comment below!